White bread

A crusty white loaf made with gentle folds and a same-day rise.

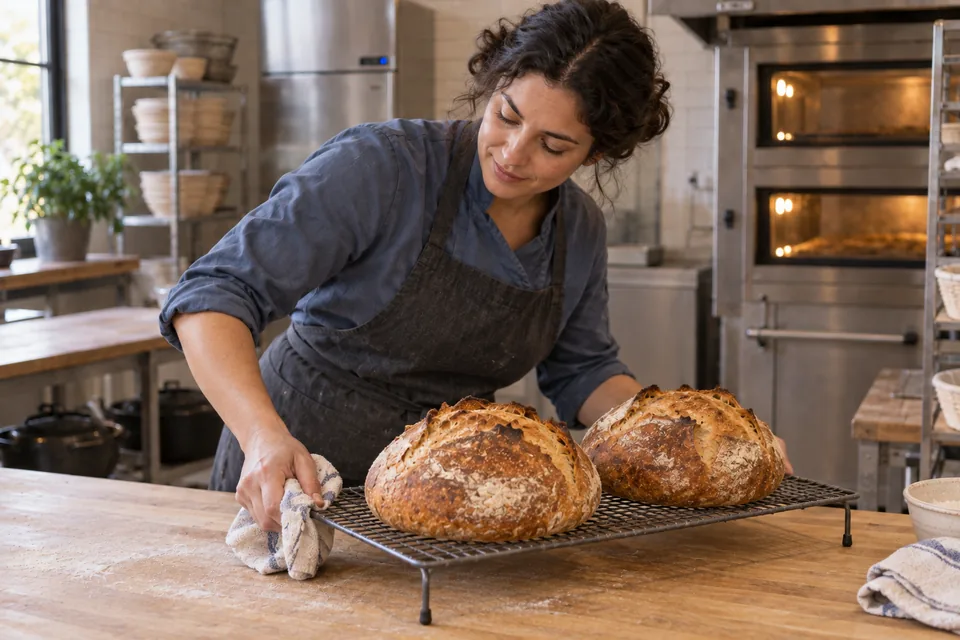
Two fully cooled round loaves on a raised wire rack, one halved to show the cream-colored crumb and irregular air pockets.
Makes
2 loaves, each about 680 g after baking
Heat
245°C conventional
Baking time
30 min covered + about 20 min uncovered

Preheat covered pots for at least 45 min. Check the crust after 15 min uncovered.

View

Same-day white bread

Makes
2 loaves, each about 680 g after baking
Heat
245°C conventional
Baking time
30 min covered + about 20 min uncovered

Preheat covered pots for at least 45 min. Check the crust after 15 min uncovered.

Straight breads

Same-day white bread

A same-day white loaf at 72% hydration, suited to bread, pizza or focaccia.

Method

  1. 01 · Autolyse

    20–30 min

    Use: A

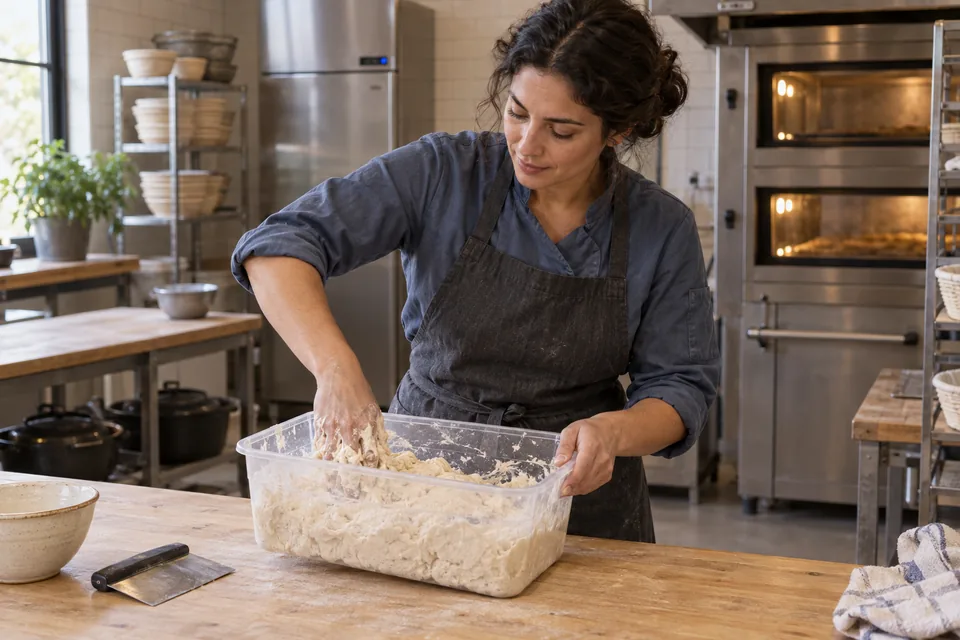
    Mix the flours, add all A water, and stir by hand until no dry flour remains. Cover.

    Ready when: Rough, fully hydrated dough; no dry pockets.
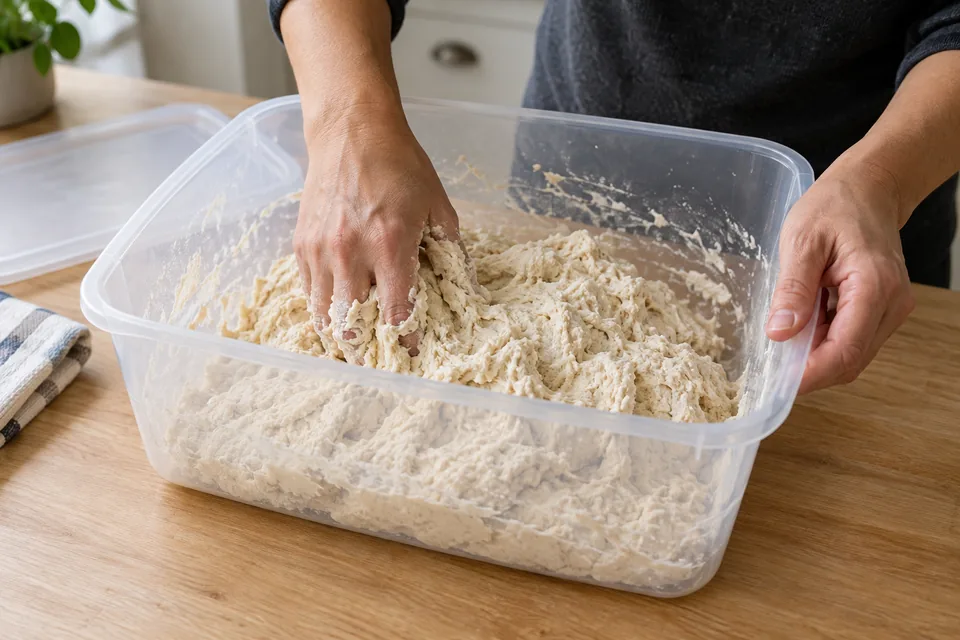
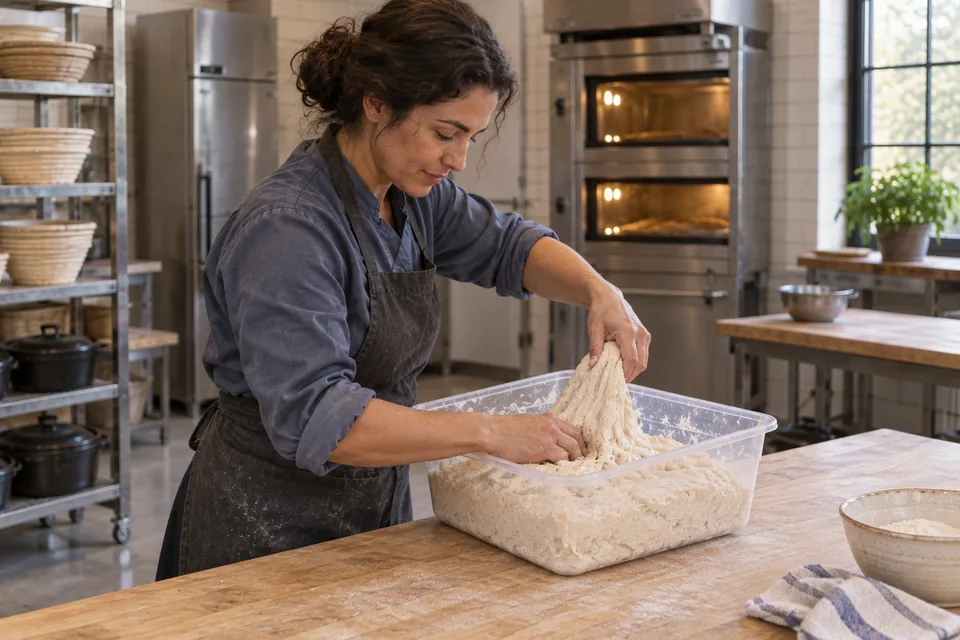
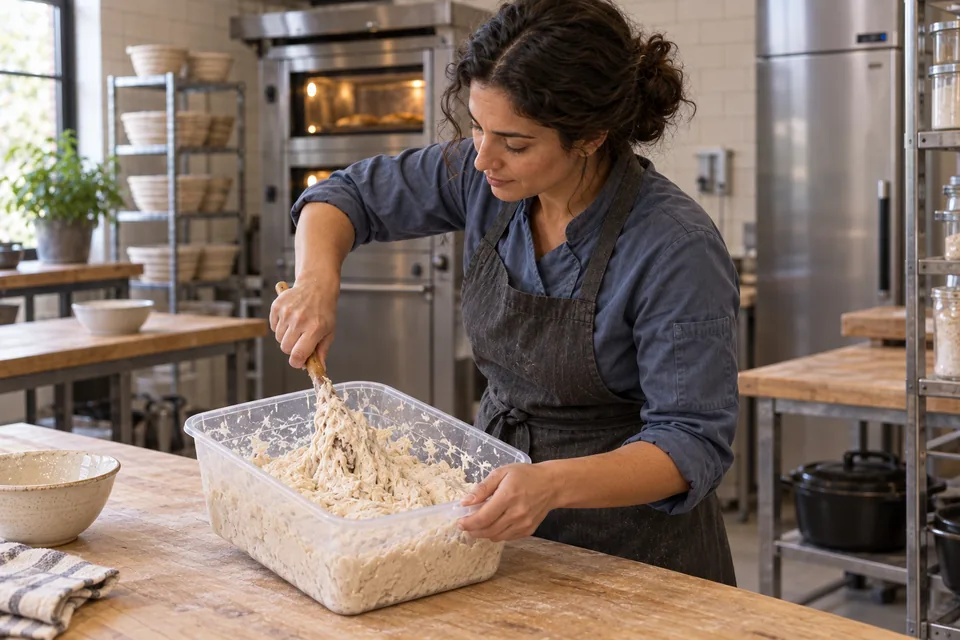
    Rough flour-and-water dough being mixed in a clear tub.
    01 Rest the flour and waterWet all the flour, then cover and rest the rough dough.
  2. 02 · Mix

    About 5 min

    Use: A + B

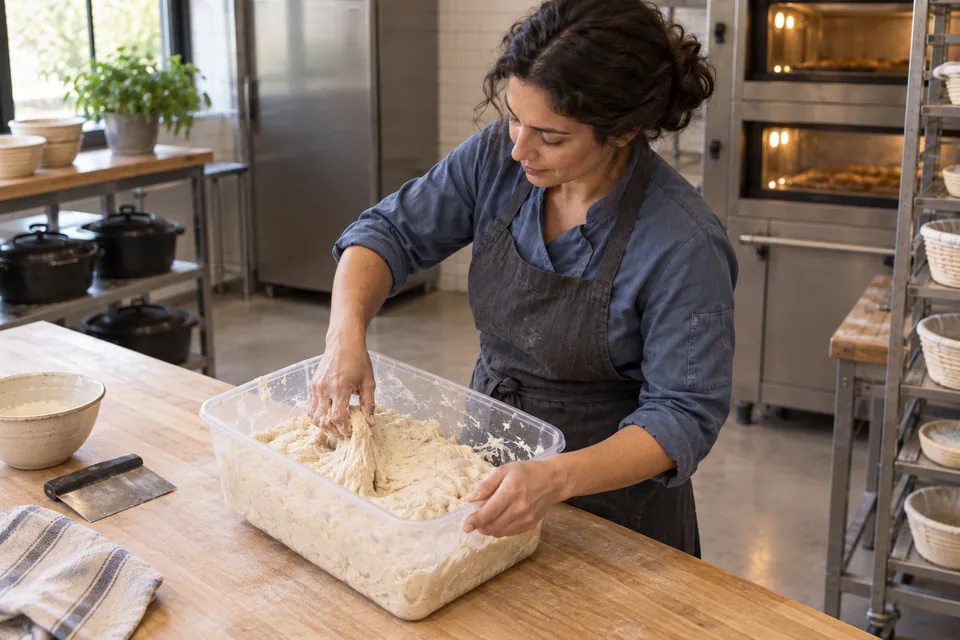
    Sprinkle B over the dough. Wet your hand. Fold the outer quarters over the salt and yeast, then pinch through the dough 5–6 times with thumb and forefinger. Alternate these cuts with folds until evenly mixed; rest briefly, then fold for another 30 seconds.

    Ready when: Even salt and yeast distribution; dough gains tension.
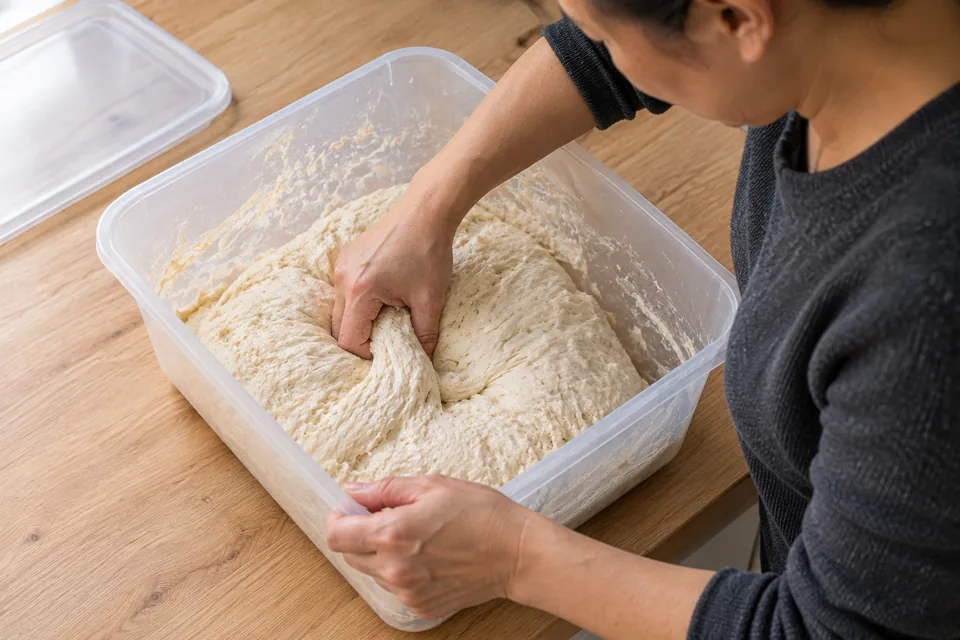
    From above, a cook pinches through the wet dough while holding the near corner of the clear mixing tub.
    02 Mix the doughPinch and fold to mix the salt and yeast evenly through the dough.
  3. 03 · Fold and bulk

    about 5 h from the end of mixing

    Use: Mixed dough

    Apply 2 sets: first about 10 minutes after mixing, second during the following hour. For each set, wet your hand; stretch one edge upward only to resistance and fold across. Repeat around 4–5 edges until the dough firms, then turn the whole mass seam down. Let it relax before the next set. Cover between folds; leave undisturbed for the final hour.

    Ready when: About 3 times its initial volume.
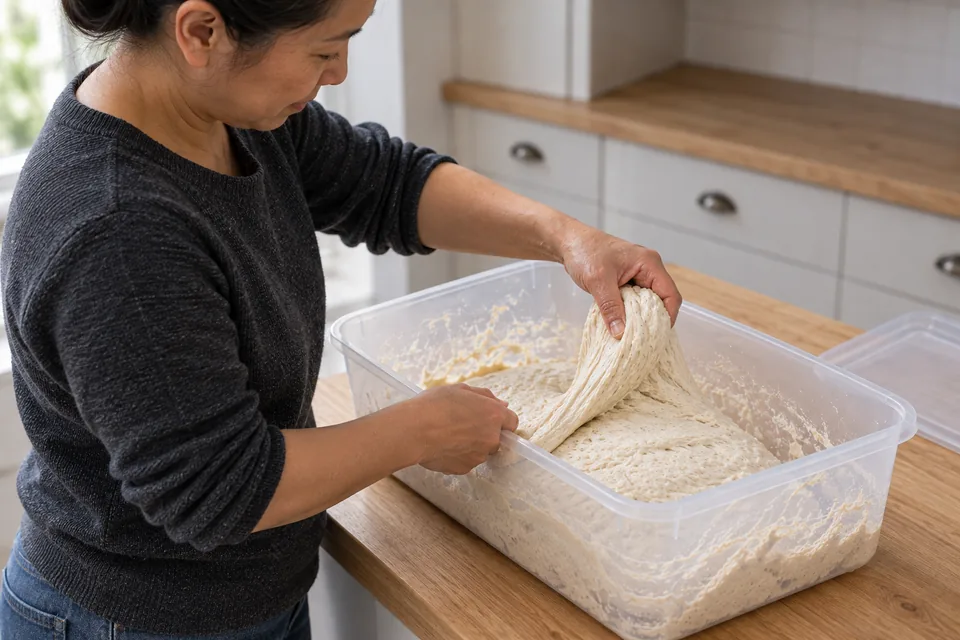
    Seen from the side, a cook lifts an edge of wet dough in the tub before folding it across the mass.
    03 Fold and let riseLift an edge gently and fold it across; allow time for the dough to rise.
  4. 04 · Divide and shape

    A few minutes

    Use: Risen dough; dusting flour

    Ease dough onto a lightly floured counter without tearing. Divide equally. Fold each piece’s edges inward to enclose it, turn seam down onto a clean unfloured patch, and cup and drag toward you while turning to make a medium-tight ball. Set seam DOWN in a well-floured basket; flour the top and cover.

    Ready when: Two smooth rounds that hold moderate tension without torn skins.
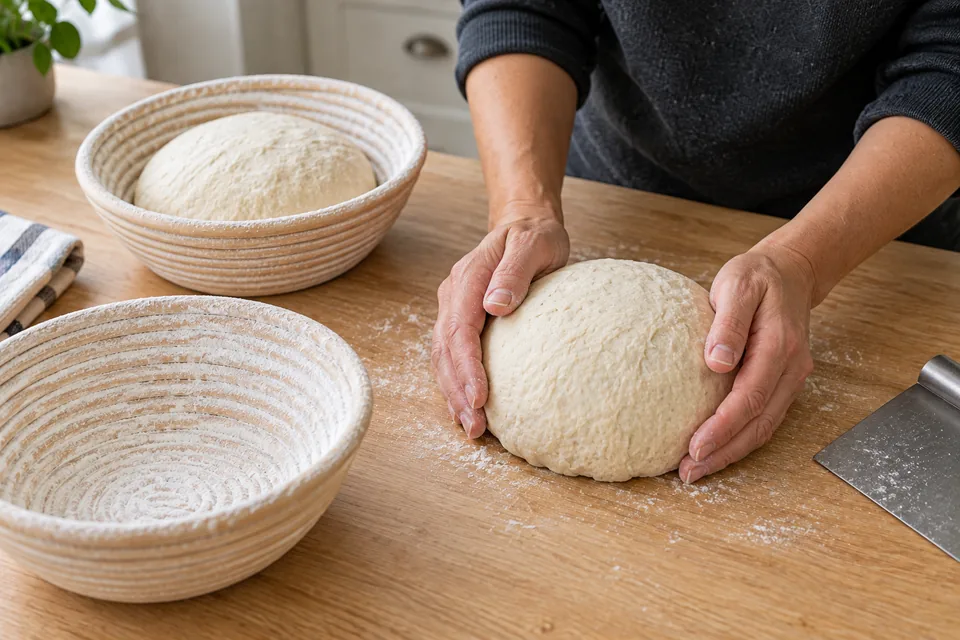
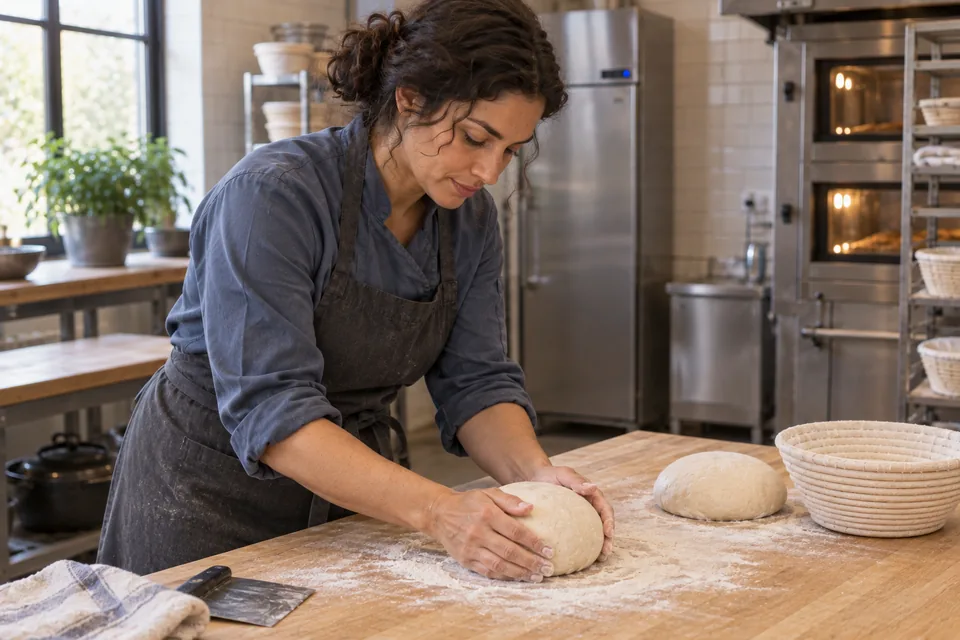
    Hands cupping one dough round on the worktop, with a second round smooth-side up in a floured basket.
    04 Shape the loavesMake two smooth rounds, keeping the surface intact and some air inside.
  5. 05 · Proof

    about 1¼ h at about 21°C; nearer 1 h if warmer

    Use: Shaped loaves

    Proof covered. Gently press the loaf with a floured fingertip to make a small dent: a slow, incomplete return indicates readiness; immediate spring-back means wait; no return with a slack loaf suggests overproofing.

    Ready when: Expanded loaves, still able to hold their shape; check from 1 h.
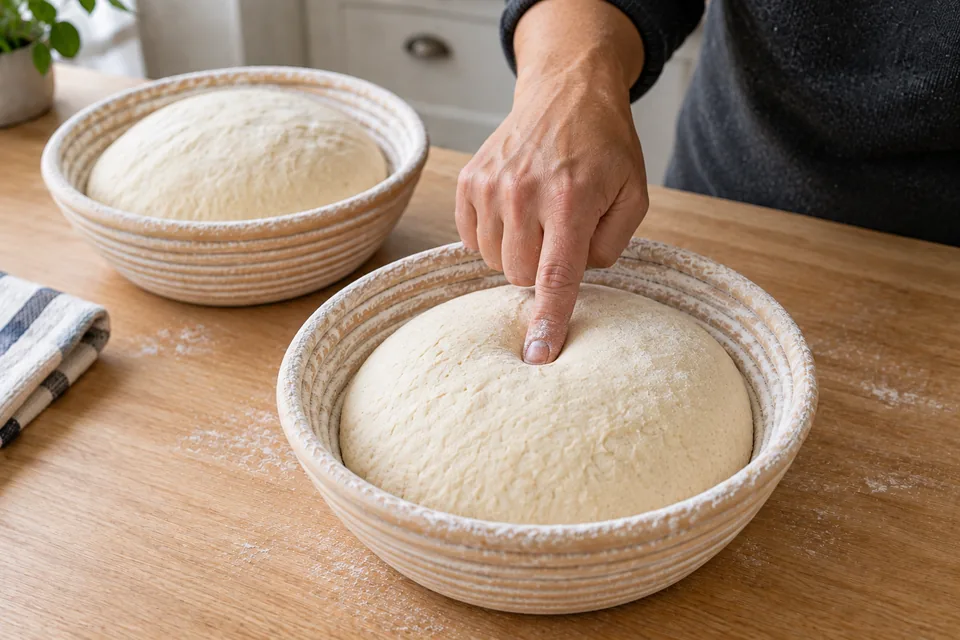
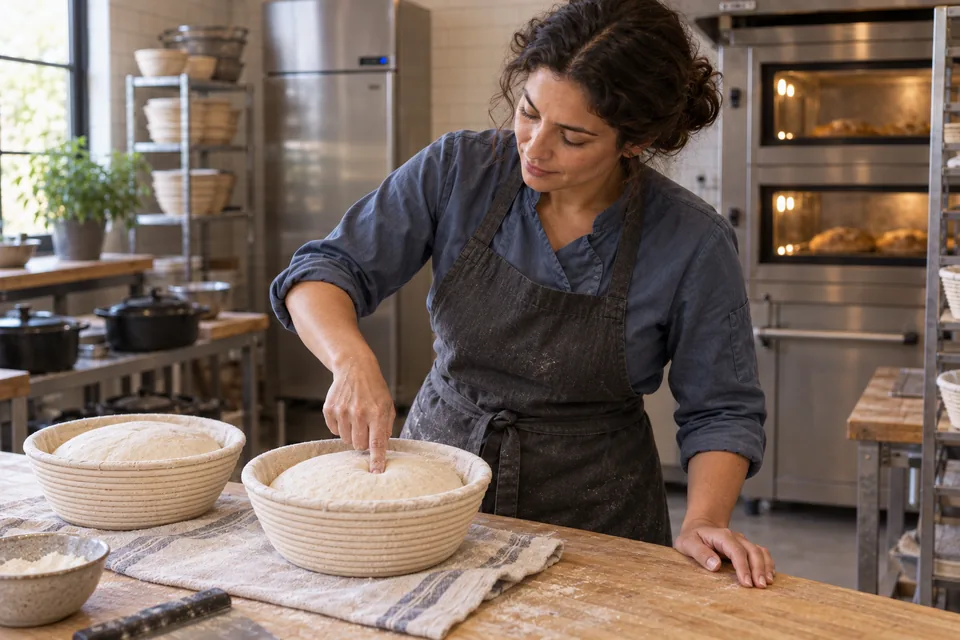
    A fingertip gently checking a risen loaf in a floured bread basket.
    05 Let the loaves riseLook for a puffy loaf and a finger dent that slowly rises partway back.
  6. 06 · Preheat during proof

    At least 45 min at 245°C

    Use: Oven and lidded pots

    Put lidded Dutch ovens on the middle rack and heat fully. If using one pot, refrigerate the second room-proofing loaf about 20 minutes before baking the first; reheat the empty pot 5 minutes between loaves.

    Ready when: Pots and oven fully heat-soaked.
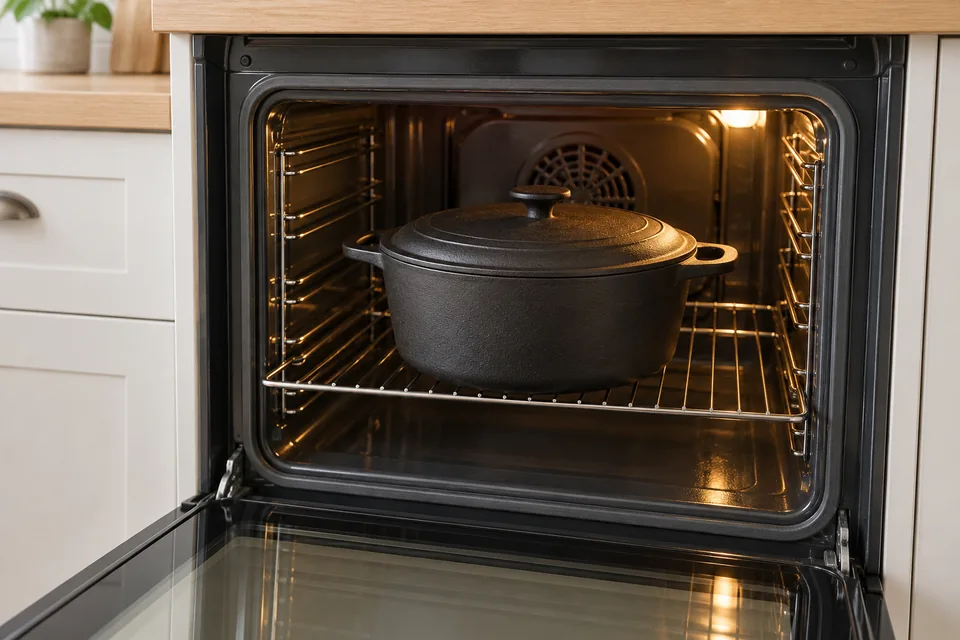
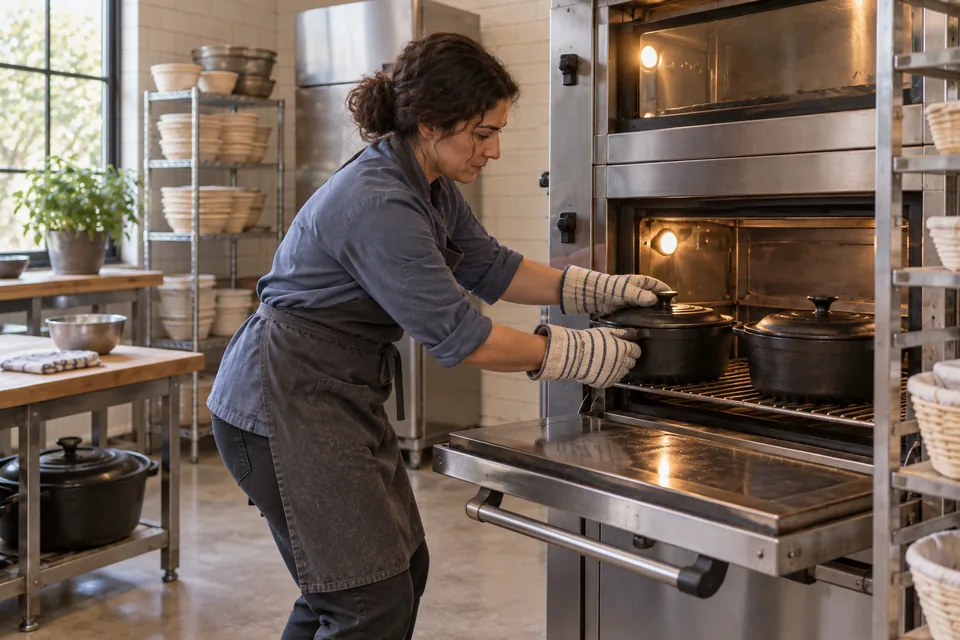
    One lidded black cast-iron pot on the middle oven rack.
    06 Heat the oven and potHeat the covered pot thoroughly. If using one pot, keep the second loaf cool as directed.
  7. 07 · Load and bake

    245°C throughout

    Use: Proofed loaf

    Invert the loaf onto a lightly floured counter, then carefully lower it seam UP into the hot pot, avoiding the hot sides. No scoring is needed: the seam opens naturally. Use mitts for the pot and lid. Bake covered 30 minutes; remove the lid and bake about 20 min more. Begin checking 15 minutes after uncovering.

    Ready when: Crust at least medium-dark brown all around, with a naturally split top.
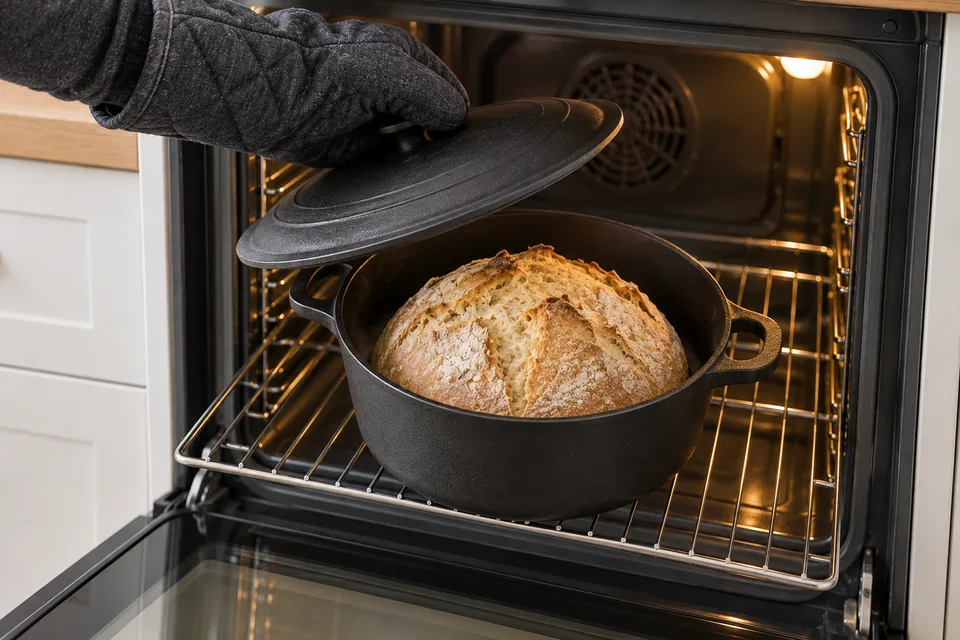
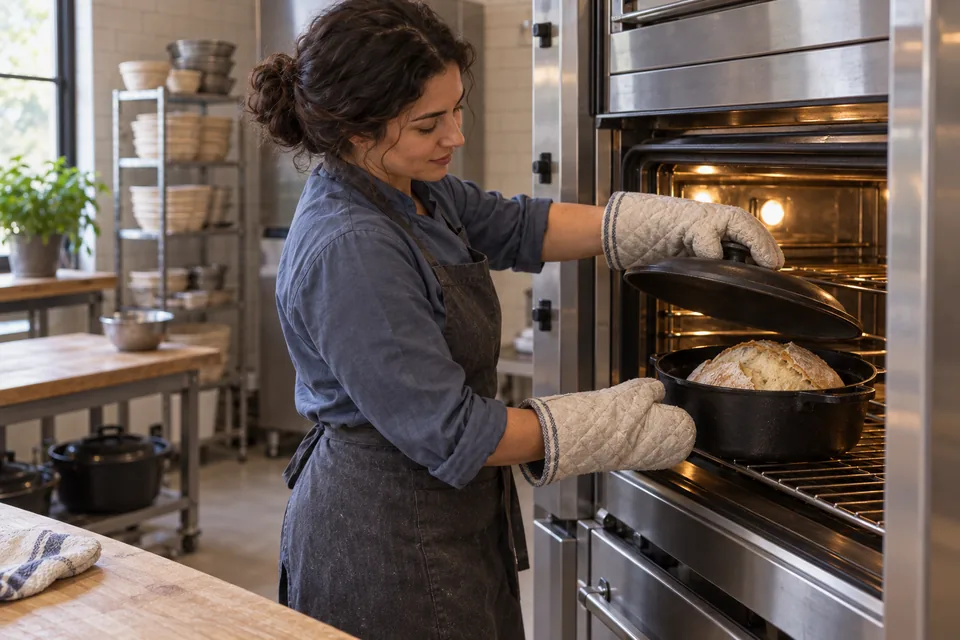
    A lid being lifted with oven mitts, revealing a light-golden loaf with a naturally split top in a cast-iron pot on the oven rack.
    07 Bake the breadAfter 30 minutes covered, lift the lid with oven mitts. Finish uncovered until the crust is deeply browned.
  8. 08 · Cool

    At least 20 min

    Use: Baked loaves

    Turn the bread out and cool on a rack with air beneath it. Wait at least 20 minutes before slicing; allow longer if the center is still very hot.

    Ready when: Crumb has begun to set; steam can escape on all sides.
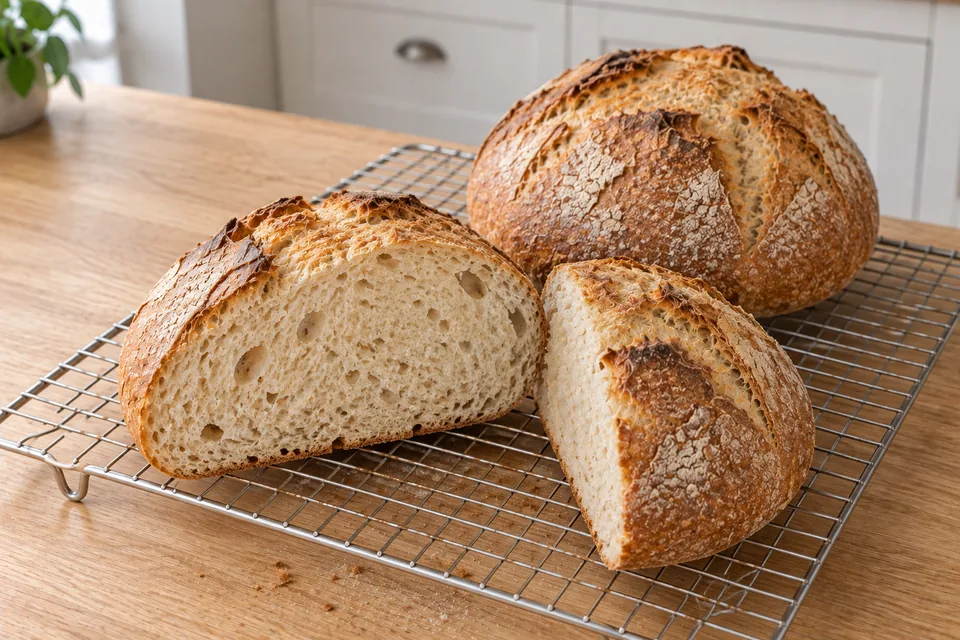
    Two fully cooled round loaves on a raised wire rack, one halved to show the cream-colored crumb and irregular air pockets.
    08 Let it coolMove the bread to a rack and give the inside time to firm up before slicing.

What to look for

StageLook and feelNeeds attention
After foldsDough holds a rounded form longer after each fold.Forcing the dough beyond resistance or folding during the final hour of bulk.
End of bulkAbout 3 times its initial volume.Shaping solely because the clock says so; temperature changes the pace.
Ready to bakeA fully aerated loaf that keeps its outline; for room proof, a dent returns slowly and incompletely.A fast spring-back or a fragile, collapsing loaf.

Troubleshooting

If you seeLikely causeWhat to do nowNext time
Little rise by the stated timeCooler dough or room; weak or inaccurate yeast dose.Check dough temperature and expansion. Allow more time in a gently warm place; continue only when the recipe’s volume cue is reached.Weigh yeast carefully and record final dough temperature; adjust the next batch’s water temperature.
Loaf spreads or collapses at loadingFinal proof went too far or shaping left insufficient tension.Load gently and bake promptly; expect reduced height.Begin checking early, particularly in warmth. Shape with moderate tension and refrigerate a second loaf while the first bakes.
Dark bottom but pale upper crustUneven oven heat or a rack too close to the bottom element.Check oven temperature and finish by crust color while monitoring the base.Use the middle rack and a fully heated pot; verify actual oven temperature.

Recipe notes

  • Times are estimates for the stated yeast dose and dough. Warmer kitchens shorten fermentation; follow the expansion and texture cues.
  • Variation: replace 100 g of the white flour with 100 g whole wheat (900 g white + 100 g whole wheat); keep the other ingredients and process the same.
  • For a next-morning loaf, refrigerate one shaped basket immediately, covered, then bake cold the following morning.
Show ingredient flow

Recipe

Same-day white bread

A same-day white loaf at 72% hydration, suited to bread, pizza or focaccia.

How do I make it?

  1. Rest the flour and water

    20–30 min

    Mix the flours with all the water listed in group A until every bit of flour is wet. Cover the bowl and let the mixture rest.

    Rough flour-and-water dough being mixed in a clear tub.
    Wet all the flour, then cover and rest the rough dough.

    Ready when: Rough dough with all the flour wet and no dry patches.

  2. Mix the dough

    About 5 min

    Sprinkle the salt and yeast in group B over the dough, then wet your hand and fold the four outer edges over them. Pinch right through the dough with your thumb and forefinger 5–6 times, then fold it; keep alternating until the additions are evenly mixed in. Rest briefly, then fold for another 30 seconds.

    From above, a cook pinches through the wet dough while holding the near corner of the clear mixing tub.
    Pinch and fold to mix the salt and yeast evenly through the dough.

    Ready when: Salt and yeast are mixed evenly through the dough, which feels firmer.

  3. Fold and let rise

    about 5 h from the end of mixing

    Fold the dough twice: about 10 minutes after mixing, then once more during the following hour. Each time, wet your hand, lift one edge until it starts to resist and fold it across; work around 4–5 edges until the dough firms, then turn it folded-side down. Cover, let it relax between folding rounds, and leave it untouched for the final hour of this first rise.

    Seen from the side, a cook lifts an edge of wet dough in the tub before folding it across the mass.
    Lift an edge gently and fold it across; allow time for the dough to rise.

    Ready when: About 3 times its starting size.

  4. Shape the loaves

    A few minutes

    Gently tip the dough onto a lightly floured counter without tearing it and cut it into two equal pieces. Fold each piece’s edges into the middle, turn the folded side down onto a clean patch without flour, then cup and gently pull it toward you while turning to form a smooth, moderately firm ball. Place each ball folded-side DOWN in a well-floured rising basket, flour the top and cover.

    Hands cupping one dough round on the worktop, with a second round smooth-side up in a floured basket.
    Make two smooth rounds, keeping the surface intact and some air inside.

    Ready when: Two smooth, moderately firm rounds with no tears on the surface.

  5. Let the loaves rise

    about 1¼ h at about 21°C; nearer 1 h if warmer

    Keep the shaped loaves covered as they rise. Gently press a loaf with a floured fingertip to make a small dent: it is ready when the dent slowly rises partway back. If it springs straight back, wait longer; if the dent stays and the loaf feels loose and weak, it may have risen too far.

    A fingertip gently checking a risen loaf in a floured bread basket.
    Look for a puffy loaf and a finger dent that slowly rises partway back.

    Ready when: Loaves have grown but still hold their shape; start checking at 1 h.

  6. Heat the oven and pots

    At least 45 min at 245°C

    Heat the heavy lidded pots on the oven’s middle rack until fully hot. If you have only one pot, put the second loaf in the fridge about 20 minutes before baking the first. Reheat the empty pot for 5 minutes before baking the second loaf.

    One lidded black cast-iron pot on the middle oven rack.
    Heat the covered pot thoroughly. If using one pot, keep the second loaf cool as directed.

    Ready when: The pots and oven are fully hot.

  7. Bake the bread

    245°C throughout

    Turn the loaf out onto a lightly floured counter, then use oven mitts to carefully lower it folded-side UP into the hot pot without touching the sides. Leave the top uncut—the fold will open as it bakes—and bake with the lid on for 30 minutes. Remove the lid and bake about 20 minutes more, starting to check the crust after 15 minutes.

    A lid being lifted with oven mitts, revealing a light-golden loaf with a naturally split top in a cast-iron pot on the oven rack.
    After 30 minutes covered, lift the lid with oven mitts. Finish uncovered until the crust is deeply browned.

    Ready when: The crust is medium-dark brown or darker all around, and the top has split open.

  8. Let it cool

    At least 20 min

    Take the bread out of the pot and set it on a rack so air can pass underneath. Wait at least 20 minutes before slicing, and longer if the middle is still very hot.

    Two fully cooled round loaves on a raised wire rack, one halved to show the cream-colored crumb and irregular air pockets.
    Move the bread to a rack and give the inside time to firm up before slicing.

    Ready when: The inside is beginning to firm up, with room for steam to escape on all sides.

What can go wrong, and how can I fix it?

What you noticeLikely causeWhat to do
Little rise by the stated timeCooler dough or room; weak or inaccurate yeast dose.Check dough temperature and expansion. Allow more time in a gently warm place; continue only when the recipe’s volume cue is reached. Weigh yeast carefully and record final dough temperature; adjust the next batch’s water temperature.
Loaf spreads or collapses at loadingFinal proof went too far or shaping left insufficient tension.Load gently and bake promptly; expect reduced height. Begin checking early, particularly in warmth. Shape with moderate tension and refrigerate a second loaf while the first bakes.
Dark bottom but pale upper crustUneven oven heat or a rack too close to the bottom element.Check oven temperature and finish by crust color while monitoring the base. Use the middle rack and a fully heated pot; verify actual oven temperature.
Useful recipe notes

Times are estimates for the stated yeast dose and dough. Warmer kitchens shorten fermentation; follow the expansion and texture cues.

Variation: replace 100 g of the white flour with 100 g whole wheat (900 g white + 100 g whole wheat); keep the other ingredients and process the same.

For a next-morning loaf, refrigerate one shaped basket immediately, covered, then bake cold the following morning.

See the detailed method and ratios in , or follow ingredients through the .

Ingredient proportions & recipe details

Same-day white bread at a glance

Makes
2 loaves, each about 680 g after baking
Heat
245°C conventional
Baking time
30 min covered + about 20 min uncovered
Dough hydration
72%
Prefermented flour
0% of total flour
Leavening
Yeast
Bulk fermentation
about 5 h from the end of mixing · About 3 times its initial volume.
How do the ingredient proportions compare?

Core dough totals include the flour and water in the portion of starter or preferment used. Do not add them again. Toppings, fillings and dusting flour are separate.

Formula componentGramsFlour = 100%
Total flour1000 g100%
Total water720 g72%
Salt21 g2.1%
Instant yeast4 g0.4%

Overnight White Bread

Makes
2 loaves, each about 680 g after baking
Heat
245°C conventional
Baking time
30 min covered + 20–30 min uncovered

Preheat covered pots for at least 45 min. Check the crust after 15 min uncovered.

Straight breads

Overnight White Bread

A low-yeast white dough with an overnight bulk rise; 78% hydration and an open crumb. Also suits focaccia or skillet pizza.

Method

  1. 01 · Autolyse

    20–30 min

    Use: A

    Mix the flours, add all A water, and stir by hand until no dry flour remains. Cover.

    Ready when: Rough, fully hydrated dough; no dry pockets.

    A baker leans over a clear tub, combining rough ivory flour-and-water dough with one hand.
    01 Rest the flour and waterWet all the flour, then cover the rough dough and let it rest.
  2. 02 · Mix

    About 5 min

    Use: A + B

    Sprinkle B over the dough. Wet your hand. Fold the outer quarters over the salt and yeast, then pinch through the dough 5–6 times with thumb and forefinger. Alternate these cuts with folds until evenly mixed; rest briefly, then fold for another 30 seconds.

    Ready when: Even salt and yeast distribution; dough gains tension.

    Viewed from above, a baker pinches through ivory dough in a clear tub while steadying its rim.
    02 MixPinch and fold with a damp hand until the dough is evenly mixed.
  3. 03 · Fold and bulk

    12–14 h from the end of mixing

    Use: Mixed dough

    Apply 2–3 sets during the first 1½ hours (3 gives more strength). For each set, wet your hand; stretch one edge upward only to resistance and fold across. Repeat around 4–5 edges until the dough firms, then turn the whole mass seam down. Let it relax before the next set. Cover between folds; leave undisturbed for the final hour.

    Ready when: About 2½–3 times its initial volume.

    A baker standing side-on lifts a connected edge of ivory dough inside a clear tub.
    03 Fold and bulkLift one edge only until it resists, fold it across, then cover between sets.
  4. 04 · Divide and shape

    A few minutes

    Use: Risen dough; dusting flour

    Ease dough onto a lightly floured counter without tearing. Divide equally. Fold each piece’s edges inward to enclose it, turn seam down onto a clean unfloured patch, and cup and drag toward you while turning to make a medium-tight ball. Set seam DOWN in a well-floured basket; flour the top and cover.

    Ready when: Two smooth rounds that hold moderate tension without torn skins.

    A baker cups one smooth white dough round on the bench, with a second round beside an empty basket.
    04 Divide and shapeDivide evenly and cup each piece into a round without tearing its surface.
  5. 05 · Proof

    about 1¼ h at about 21°C; nearer 1 h if warmer

    Use: Shaped loaves

    Proof covered. Gently press the loaf with a floured fingertip to make a small dent: a slow, incomplete return indicates readiness; immediate spring-back means wait; no return with a slack loaf suggests overproofing.

    Ready when: Expanded loaves, still able to hold their shape; check from 1 h.

    A baker gently presses a floured fingertip into one of two expanded white dough rounds in baskets.
    05 ProofLet the rounds become puffy; a small fingertip dent should return slowly and only partway.
  6. 06 · Preheat during proof

    At least 45 min at 245°C

    Use: Oven and lidded pots

    Put lidded Dutch ovens on the middle rack and heat fully. If using one pot, refrigerate the second room-proofing loaf about 20 minutes before baking the first; reheat the empty pot 5 minutes between loaves.

    Ready when: Pots and oven fully heat-soaked.

    A baker wearing oven mitts positions two lidded black Dutch ovens on an oven rack.
    06 Preheat during proofHeat the covered pots thoroughly while the loaves finish proofing.
  7. 07 · Load and bake

    245°C throughout

    Use: Proofed loaf

    Invert the loaf onto a lightly floured counter, then carefully lower it seam UP into the hot pot, avoiding the hot sides. No scoring is needed: the seam opens naturally. Use mitts for the pot and lid. Bake covered 30 minutes; remove the lid and bake 20–30 min more. Begin checking 15 minutes after uncovering.

    Ready when: Crust at least medium-dark brown all around, with a naturally split top.

    A baker lifts a hot pot lid with an oven mitt, revealing a white loaf with a naturally opened top.
    07 Load and bakeThe seam opens by itself. After the covered bake, remove the lid with mitts and finish browning uncovered.
  8. 08 · Cool

    At least 20 min

    Use: Baked loaves

    Turn the bread out and cool on a rack with air beneath it. Wait at least 20 minutes before slicing; allow longer if the center is still very hot.

    Ready when: Crumb has begun to set; steam can escape on all sides.

    A baker arranges a wire rack holding two intact golden-brown round loaves with naturally burst tops.
    08 CoolLet air circulate underneath both loaves and give the crumb time to set before slicing.

What to look for

StageLook and feelNeeds attention
After foldsDough holds a rounded form longer after each fold.Forcing the dough beyond resistance or folding during the final hour of bulk.
End of bulkAbout 2½–3 times its initial volume.Shaping solely because the clock says so; temperature changes the pace.
Ready to bakeA fully aerated loaf that keeps its outline; for room proof, a dent returns slowly and incompletely.A fast spring-back or a fragile, collapsing loaf.

Troubleshooting

If you seeLikely causeWhat to do nowNext time
Little rise by the stated timeCooler dough or room; weak or inaccurate yeast dose.Check dough temperature and expansion. Allow more time in a gently warm place; continue only when the recipe’s volume cue is reached.Weigh yeast carefully and record final dough temperature; adjust the next batch’s water temperature.
Loaf spreads or collapses at loadingFinal proof went too far or shaping left insufficient tension.Load gently and bake promptly; expect reduced height.Begin checking early, particularly in warmth. Shape with moderate tension and refrigerate a second loaf while the first bakes.
Dark bottom but pale upper crustUneven oven heat or a rack too close to the bottom element.Check oven temperature and finish by crust color while monitoring the base.Use the middle rack and a fully heated pot; verify actual oven temperature.

Recipe notes

  • Times are estimates for the stated yeast dose and dough. Warmer kitchens shorten fermentation; follow the expansion and texture cues.
Show ingredient flow

Recipe

Overnight White Bread

A low-yeast white dough with an overnight bulk rise; 78% hydration and an open crumb. Also suits focaccia or skillet pizza.

How do I make it?

  1. Rest the flour and water

    20–30 min

    Mix the flours with all the water listed in group A until every bit of flour is wet. Cover the bowl and let the mixture rest.

    A baker leans over a clear tub, combining rough ivory flour-and-water dough with one hand.
    Wet all the flour, then cover the rough dough and let it rest.

    Ready when: Rough dough with all the flour wet and no dry patches.

  2. Mix the dough

    About 5 min

    Sprinkle the salt and yeast in group B over the dough, then wet your hand and fold the four outer edges over them. Pinch right through the dough with your thumb and forefinger 5–6 times, then fold it; keep alternating until the additions are evenly mixed in. Rest briefly, then fold for another 30 seconds.

    Viewed from above, a baker pinches through ivory dough in a clear tub while steadying its rim.
    Pinch and fold with a damp hand until the dough is evenly mixed.

    Ready when: Salt and yeast are mixed evenly through the dough, which feels firmer.

  3. Fold and let rise

    12–14 h from the end of mixing

    Fold the dough 2–3 times during the first 1½ hours; 3 rounds make it stronger. Each time, wet your hand, lift one edge just until it resists and fold it across; repeat around 4–5 edges until the dough firms, then turn it folded-side down. Keep it covered, let it relax between rounds, and leave it untouched for the final hour of this first rise.

    A baker standing side-on lifts a connected edge of ivory dough inside a clear tub.
    Lift one edge only until it resists, fold it across, then cover between sets.

    Ready when: About 2½–3 times its starting size.

  4. Shape the loaves

    A few minutes

    Gently tip the dough onto a lightly floured counter without tearing it and cut it into two equal pieces. Fold each piece’s edges into the middle, turn the folded side down onto a clean patch without flour, then cup and gently pull it toward you while turning to form a smooth, moderately firm ball. Place each ball folded-side DOWN in a well-floured rising basket, flour the top and cover.

    A baker cups one smooth white dough round on the bench, with a second round beside an empty basket.
    Divide evenly and cup each piece into a round without tearing its surface.

    Ready when: Two smooth, moderately firm rounds with no tears on the surface.

  5. Let the loaves rise

    about 1¼ h at about 21°C; nearer 1 h if warmer

    Keep the shaped loaves covered as they rise. Gently press a loaf with a floured fingertip to make a small dent: it is ready when the dent slowly rises partway back. If it springs straight back, wait longer; if the dent stays and the loaf feels loose and weak, it may have risen too far.

    A baker gently presses a floured fingertip into one of two expanded white dough rounds in baskets.
    Let the rounds become puffy; a small fingertip dent should return slowly and only partway.

    Ready when: Loaves have grown but still hold their shape; start checking at 1 h.

  6. Heat the oven and pots

    At least 45 min at 245°C

    Heat the heavy lidded pots on the oven’s middle rack until fully hot. If you have only one pot, put the second loaf in the fridge about 20 minutes before baking the first. Reheat the empty pot for 5 minutes before baking the second loaf.

    A baker wearing oven mitts positions two lidded black Dutch ovens on an oven rack.
    Heat the covered pots thoroughly while the loaves finish proofing.

    Ready when: The pots and oven are fully hot.

  7. Bake the bread

    245°C throughout

    Turn the loaf out onto a lightly floured counter, then use oven mitts to carefully lower it folded-side UP into the hot pot without touching the sides. Leave the top uncut—the fold will open as it bakes—and bake with the lid on for 30 minutes. Remove the lid and bake 20–30 minutes more, starting to check the crust after 15 minutes.

    A baker lifts a hot pot lid with an oven mitt, revealing a white loaf with a naturally opened top.
    The seam opens by itself. After the covered bake, remove the lid with mitts and finish browning uncovered.

    Ready when: The crust is medium-dark brown or darker all around, and the top has split open.

  8. Let it cool

    At least 20 min

    Take the bread out of the pot and set it on a rack so air can pass underneath. Wait at least 20 minutes before slicing, and longer if the middle is still very hot.

    A baker arranges a wire rack holding two intact golden-brown round loaves with naturally burst tops.
    Let air circulate underneath both loaves and give the crumb time to set before slicing.

    Ready when: The inside is beginning to firm up, with room for steam to escape on all sides.

What can go wrong, and how can I fix it?

What you noticeLikely causeWhat to do
Little rise by the stated timeCooler dough or room; weak or inaccurate yeast dose.Check dough temperature and expansion. Allow more time in a gently warm place; continue only when the recipe’s volume cue is reached. Weigh yeast carefully and record final dough temperature; adjust the next batch’s water temperature.
Loaf spreads or collapses at loadingFinal proof went too far or shaping left insufficient tension.Load gently and bake promptly; expect reduced height. Begin checking early, particularly in warmth. Shape with moderate tension and refrigerate a second loaf while the first bakes.
Dark bottom but pale upper crustUneven oven heat or a rack too close to the bottom element.Check oven temperature and finish by crust color while monitoring the base. Use the middle rack and a fully heated pot; verify actual oven temperature.
Useful recipe notes

Times are estimates for the stated yeast dose and dough. Warmer kitchens shorten fermentation; follow the expansion and texture cues.

See the detailed method and ratios in , or follow ingredients through the .

Ingredient proportions & recipe details

Overnight White Bread at a glance

Makes
2 loaves, each about 680 g after baking
Heat
245°C conventional
Baking time
30 min covered + 20–30 min uncovered
Dough hydration
78%
Prefermented flour
0% of total flour
Leavening
Yeast
Bulk fermentation
12–14 h from the end of mixing · About 2½–3 times its initial volume.
How do the ingredient proportions compare?

Core dough totals include the flour and water in the portion of starter or preferment used. Do not add them again. Toppings, fillings and dusting flour are separate.

Formula componentGramsFlour = 100%
Total flour1000 g100%
Total water780 g78%
Salt22 g2.2%
Instant yeast0.8 g0.1%

Overnight white bread with a refrigerated final rise

Makes
2 loaves, each about 680 g after baking
Heat
245°C conventional
Baking time
30 min covered + 20–30 min uncovered

Preheat covered pots for at least 45 min. Check the crust after 15 min uncovered.

Straight breads

Overnight white bread with a refrigerated final rise

Mix at night, shape in the morning, refrigerate during the day and bake after work.

Method

  1. 01 · Autolyse

    20–30 min

    Use: A

    Mix the flours, add all A water, and stir by hand until no dry flour remains. Cover.

    Ready when: Rough, fully hydrated dough; no dry pockets.

    A baker leans over a clear tub, combining rough ivory flour-and-water dough with one hand.
    01 Rest the flour and waterWet all the flour, then cover the rough dough and let it rest.
  2. 02 · Mix

    About 5 min

    Use: A + B

    Sprinkle B over the dough. Wet your hand. Fold the outer quarters over the salt and yeast, then pinch through the dough 5–6 times with thumb and forefinger. Alternate these cuts with folds until evenly mixed; rest briefly, then fold for another 30 seconds.

    Ready when: Even salt and yeast distribution; dough gains tension.

    Viewed from above, a baker pinches through ivory dough in a clear tub while steadying its rim.
    02 MixPinch and fold with a damp hand until the dough is evenly mixed.
  3. 03 · Fold and bulk

    12–14 h from the end of mixing

    Use: Mixed dough

    Apply 2–3 sets during the first 1½ hours (3 gives more strength). For each set, wet your hand; stretch one edge upward only to resistance and fold across. Repeat around 4–5 edges until the dough firms, then turn the whole mass seam down. Let it relax before the next set. Cover between folds; leave undisturbed for the final hour.

    Ready when: About 2½–3 times its initial volume.

    A baker standing side-on lifts a connected edge of ivory dough inside a clear tub.
    03 Fold and bulkLift one edge only until it resists, fold it across, then cover between sets.
  4. 04 · Divide and shape

    A few minutes

    Use: Risen dough; dusting flour

    Ease dough onto a lightly floured counter without tearing. Divide equally. Fold each piece’s edges inward to enclose it, turn seam down onto a clean unfloured patch, and cup and drag toward you while turning to make a medium-tight ball. Set seam DOWN in a well-floured basket; flour the top and cover.

    Ready when: Two smooth rounds that hold moderate tension without torn skins.

    A baker cups one smooth white dough round on the bench, with a second round beside an empty basket.
    04 Divide and shapeDivide evenly and cup each piece into a round without tearing its surface.
  5. 05 · Workday proof

    about 10 h, including the workday in the refrigerator

    Use: Shaped loaves

    Bag the baskets and refrigerate while at work. On returning, put them on the counter to complete proofing while the pots preheat. Proof covered. Gently press the loaf with a floured fingertip to make a small dent: a slow, incomplete return indicates readiness; immediate spring-back means wait; no return with a slack loaf suggests overproofing.

    Ready when: Expanded, aerated loaves; slow partial recovery from a gentle press after warming.

    A baker gently presses a floured fingertip into one of two expanded white dough rounds in baskets.
    05 Finish the cold riseAfter the bagged baskets have chilled through the day, finish proofing on the counter; check for slow, partial recovery from a gentle press.
  6. 06 · Preheat during proof

    At least 45 min at 245°C

    Use: Oven and lidded pots

    Put lidded Dutch ovens on the middle rack and heat fully. If using one pot, refrigerate the second room-proofing loaf about 20 minutes before baking the first; reheat the empty pot 5 minutes between loaves.

    Ready when: Pots and oven fully heat-soaked.

    A baker wearing oven mitts positions two lidded black Dutch ovens on an oven rack.
    06 Preheat during proofHeat the covered pots thoroughly while the loaves finish proofing.
  7. 07 · Load and bake

    245°C throughout

    Use: Proofed loaf

    Invert the loaf onto a lightly floured counter, then carefully lower it seam UP into the hot pot, avoiding the hot sides. No scoring is needed: the seam opens naturally. Use mitts for the pot and lid. Bake covered 30 minutes; remove the lid and bake 20–30 min more. Begin checking 15 minutes after uncovering.

    Ready when: Crust at least medium-dark brown all around, with a naturally split top.

    A baker lifts a hot pot lid with an oven mitt, revealing a white loaf with a naturally opened top.
    07 Load and bakeThe seam opens by itself. After the covered bake, remove the lid with mitts and finish browning uncovered.
  8. 08 · Cool

    At least 20 min

    Use: Baked loaves

    Turn the bread out and cool on a rack with air beneath it. Wait at least 20 minutes before slicing; allow longer if the center is still very hot.

    Ready when: Crumb has begun to set; steam can escape on all sides.

    A baker arranges a wire rack holding two intact golden-brown round loaves with naturally burst tops.
    08 CoolLet air circulate underneath both loaves and give the crumb time to set before slicing.

What to look for

StageLook and feelNeeds attention
After foldsDough holds a rounded form longer after each fold.Forcing the dough beyond resistance or folding during the final hour of bulk.
End of bulkAbout 2½–3 times its initial volume.Shaping solely because the clock says so; temperature changes the pace.
Ready to bakeA fully aerated loaf that keeps its outline; for room proof, a dent returns slowly and incompletely.A fast spring-back or a fragile, collapsing loaf.

Troubleshooting

If you seeLikely causeWhat to do nowNext time
Little rise by the stated timeCooler dough or room; weak or inaccurate yeast dose.Check dough temperature and expansion. Allow more time in a gently warm place; continue only when the recipe’s volume cue is reached.Weigh yeast carefully and record final dough temperature; adjust the next batch’s water temperature.
Loaf spreads or collapses at loadingFinal proof went too far or shaping left insufficient tension.Load gently and bake promptly; expect reduced height.Begin checking early, particularly in warmth. Shape with moderate tension and refrigerate a second loaf while the first bakes.
Dark bottom but pale upper crustUneven oven heat or a rack too close to the bottom element.Check oven temperature and finish by crust color while monitoring the base.Use the middle rack and a fully heated pot; verify actual oven temperature.

Recipe notes

  • Times are estimates for the stated yeast dose and dough. Warmer kitchens shorten fermentation; follow the expansion and texture cues.
  • This uses the Overnight White Bread formula with a refrigerated daytime proof.
Show ingredient flow

Recipe

Overnight white bread with a refrigerated final rise

Mix at night, shape in the morning, refrigerate during the day and bake after work.

How do I make it?

  1. Rest the flour and water

    20–30 min

    Mix the flours with all the water listed in group A until every bit of flour is wet. Cover the bowl and let the mixture rest.

    A baker leans over a clear tub, combining rough ivory flour-and-water dough with one hand.
    Wet all the flour, then cover the rough dough and let it rest.

    Ready when: Rough dough with all the flour wet and no dry patches.

  2. Mix the dough

    About 5 min

    Sprinkle the salt and yeast in group B over the dough, then wet your hand and fold the four outer edges over them. Pinch right through the dough with your thumb and forefinger 5–6 times, then fold it; keep alternating until the additions are evenly mixed in. Rest briefly, then fold for another 30 seconds.

    Viewed from above, a baker pinches through ivory dough in a clear tub while steadying its rim.
    Pinch and fold with a damp hand until the dough is evenly mixed.

    Ready when: Salt and yeast are mixed evenly through the dough, which feels firmer.

  3. Fold and let rise

    12–14 h from the end of mixing

    Fold the dough 2–3 times during the first 1½ hours; 3 rounds make it stronger. Each time, wet your hand, lift one edge just until it resists and fold it across; repeat around 4–5 edges until the dough firms, then turn it folded-side down. Keep it covered, let it relax between rounds, and leave it untouched for the final hour of this first rise.

    A baker standing side-on lifts a connected edge of ivory dough inside a clear tub.
    Lift one edge only until it resists, fold it across, then cover between sets.

    Ready when: About 2½–3 times its starting size.

  4. Shape the loaves

    A few minutes

    Gently tip the dough onto a lightly floured counter without tearing it and cut it into two equal pieces. Fold each piece’s edges into the middle, turn the folded side down onto a clean patch without flour, then cup and gently pull it toward you while turning to form a smooth, moderately firm ball. Place each ball folded-side DOWN in a well-floured rising basket, flour the top and cover.

    A baker cups one smooth white dough round on the bench, with a second round beside an empty basket.
    Divide evenly and cup each piece into a round without tearing its surface.

    Ready when: Two smooth, moderately firm rounds with no tears on the surface.

  5. Chill, then finish rising

    about 10 h, including the workday in the refrigerator

    Put the rising baskets in closed food bags and refrigerate them during the workday, then let the covered loaves finish rising on the counter while the pots heat. Gently press a loaf with a floured fingertip to make a small dent: a dent that slowly rises partway back means it is ready, while a quick spring-back means it needs longer. A dent that stays in a loose, weak loaf suggests it has risen too far.

    A baker gently presses a floured fingertip into one of two expanded white dough rounds in baskets.
    After the bagged baskets have chilled through the day, finish proofing on the counter; check for slow, partial recovery from a gentle press.

    Ready when: The loaves are bigger and airy; after warming, a gentle finger dent slowly rises partway back.

  6. Heat the oven and pots

    At least 45 min at 245°C

    Heat the heavy lidded pots on the oven’s middle rack until fully hot. If you have only one pot, put the second loaf in the fridge about 20 minutes before baking the first. Reheat the empty pot for 5 minutes before baking the second loaf.

    A baker wearing oven mitts positions two lidded black Dutch ovens on an oven rack.
    Heat the covered pots thoroughly while the loaves finish proofing.

    Ready when: The pots and oven are fully hot.

  7. Bake the bread

    245°C throughout

    Turn the loaf out onto a lightly floured counter, then use oven mitts to carefully lower it folded-side UP into the hot pot without touching the sides. Leave the top uncut—the fold will open as it bakes—and bake with the lid on for 30 minutes. Remove the lid and bake 20–30 minutes more, starting to check the crust after 15 minutes.

    A baker lifts a hot pot lid with an oven mitt, revealing a white loaf with a naturally opened top.
    The seam opens by itself. After the covered bake, remove the lid with mitts and finish browning uncovered.

    Ready when: The crust is medium-dark brown or darker all around, and the top has split open.

  8. Let it cool

    At least 20 min

    Take the bread out of the pot and set it on a rack so air can pass underneath. Wait at least 20 minutes before slicing, and longer if the middle is still very hot.

    A baker arranges a wire rack holding two intact golden-brown round loaves with naturally burst tops.
    Let air circulate underneath both loaves and give the crumb time to set before slicing.

    Ready when: The inside is beginning to firm up, with room for steam to escape on all sides.

What can go wrong, and how can I fix it?

What you noticeLikely causeWhat to do
Little rise by the stated timeCooler dough or room; weak or inaccurate yeast dose.Check dough temperature and expansion. Allow more time in a gently warm place; continue only when the recipe’s volume cue is reached. Weigh yeast carefully and record final dough temperature; adjust the next batch’s water temperature.
Loaf spreads or collapses at loadingFinal proof went too far or shaping left insufficient tension.Load gently and bake promptly; expect reduced height. Begin checking early, particularly in warmth. Shape with moderate tension and refrigerate a second loaf while the first bakes.
Dark bottom but pale upper crustUneven oven heat or a rack too close to the bottom element.Check oven temperature and finish by crust color while monitoring the base. Use the middle rack and a fully heated pot; verify actual oven temperature.
Useful recipe notes

Times are estimates for the stated yeast dose and dough. Warmer kitchens shorten fermentation; follow the expansion and texture cues.

This uses the Overnight White Bread formula with a refrigerated daytime proof.

See the detailed method and ratios in , or follow ingredients through the .

Ingredient proportions & recipe details

Overnight white bread with a refrigerated final rise at a glance

Makes
2 loaves, each about 680 g after baking
Heat
245°C conventional
Baking time
30 min covered + 20–30 min uncovered
Dough hydration
78%
Prefermented flour
0% of total flour
Leavening
Yeast
Bulk fermentation
12–14 h from the end of mixing · About 2½–3 times its initial volume.
How do the ingredient proportions compare?

Core dough totals include the flour and water in the portion of starter or preferment used. Do not add them again. Toppings, fillings and dusting flour are separate.

Formula componentGramsFlour = 100%
Total flour1000 g100%
Total water780 g78%
Salt22 g2.2%
Instant yeast0.8 g0.1%

White Bread with Poolish

Makes
2 loaves, each about 680 g after baking
Heat
245°C conventional
Baking time
30 min covered + 20–30 min uncovered

Preheat covered pots for at least 45 min. Check the crust after 15 min uncovered.

Breads with preferments

White Bread with Poolish

White bread with half its flour fermented in a 100% hydration poolish; suitable for pizza and focaccia.

Method

  1. 01 · Build poolish

    12–14 h at 18–21°C

    Use: P

    Mix P flour and yeast, then stir in all P water until thoroughly combined. Cover and leave at 18–21°C.

    Ready when: Bubbly and roughly tripled; bubbles break at the surface every few seconds.

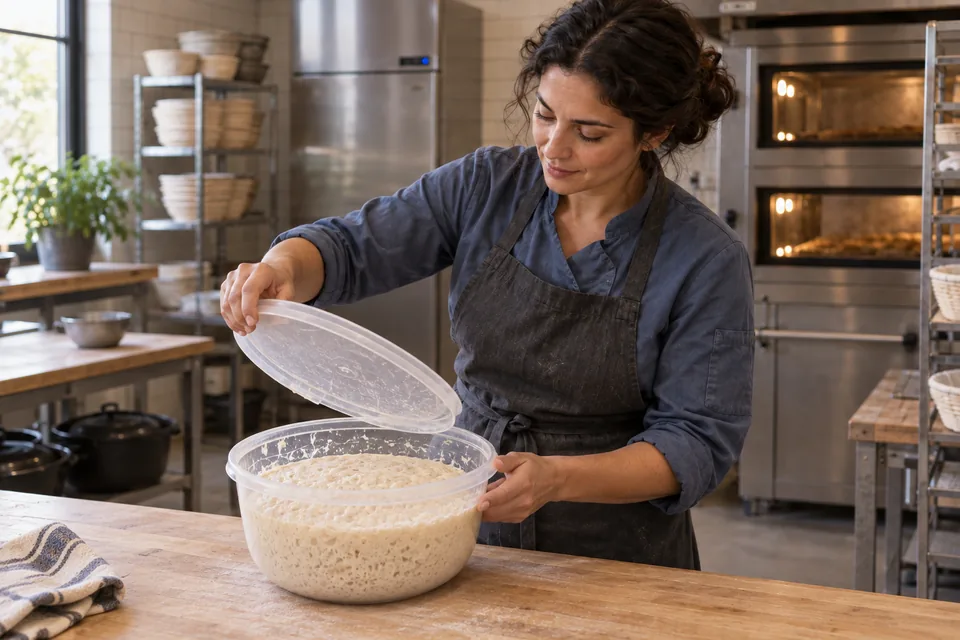
    A baker lifts the lid from a round clear bowl of bubbly, batter-like mature poolish.
    01 Build poolishUse the poolish when it is well expanded and covered in lively bubbles.
  2. 02 · Mix final dough

    A few minutes

    Use: D + all mature P

    Mix the D flour(s), salt and yeast. Pour D water around the poolish to release it, then tip all of it into D. Wet your hand and alternate 5–6 thumb-and-forefinger pinch cuts with folds until evenly combined. No autolyse is used.

    Ready when: Uniform dough with no unmixed lumps of preferment.

    Viewed from above, a baker pinches through ivory dough in a clear tub while steadying its rim.
    02 Mix final doughUse all the ripe poolish and final-dough ingredients. Pinch and fold until no unmixed preferment remains.
  3. 03 · Fold and bulk

    2–3 h from end of final mix

    Use: Mixed dough

    Apply 2–3 sets during the first hour. For each set, wet your hand; stretch one edge upward only to resistance and fold across. Repeat around 4–5 edges until the dough firms, then turn the whole mass seam down. Let it relax before the next set. Cover between folds and during the remaining rise.

    Ready when: About 2½ times its initial volume.

    A baker standing side-on lifts a connected edge of ivory dough inside a clear tub.
    03 Fold and bulkLift one edge only until it resists, fold it across, then cover between sets.
  4. 04 · Divide and shape

    A few minutes

    Use: Risen dough; dusting flour

    Ease dough onto a lightly floured counter without tearing. Divide equally. Fold each piece’s edges inward to enclose it, turn seam down onto a clean unfloured patch, and cup and drag toward you while turning to make a medium-tight ball. Set seam DOWN in a well-floured basket; flour the top and cover.

    Ready when: Two rounds with moderate tension and intact surfaces.

    A baker cups one smooth white dough round on the bench, with a second round beside an empty basket.
    04 Divide and shapeDivide evenly and cup each piece into a round without tearing its surface.
  5. 05 · Proof

    About 1 h; preheat promptly

    Use: Shaped loaves

    Proof covered. Gently press the loaf with a floured fingertip to make a small dent: a slow, incomplete return indicates readiness; immediate spring-back means wait; no return with a slack loaf suggests overproofing.

    Ready when: Loaf aerated and expanded; indentation recovers slowly and incompletely.

    A baker gently presses a floured fingertip into one of two expanded white dough rounds in baskets.
    05 ProofLet the rounds become puffy; a small fingertip dent should return slowly and only partway.
  6. 06 · Preheat during proof

    At least 45 min at 245°C

    Use: Oven and lidded pots

    Put lidded Dutch ovens on the middle rack and heat fully. If using one pot, refrigerate the second room-proofing loaf about 20 minutes before baking the first; reheat the empty pot 5 minutes between loaves.

    Ready when: Pots and oven fully heat-soaked.

    A baker wearing oven mitts positions two lidded black Dutch ovens on an oven rack.
    06 Preheat during proofHeat the covered pots thoroughly while the loaves finish proofing.
  7. 07 · Load and bake

    245°C throughout

    Use: Proofed loaf

    Invert the loaf onto a floured counter, seam up. Optional fendue shape: flour a stripe across its middle and press a 2.5 cm dowel to the counter, rolling it slightly to make a flattened central band about 2.5 cm wide. Carefully lower the loaf seam UP into the hot pot. No scoring is needed. Avoid touching the hot sides and use mitts for pot and lid. Bake covered 30 minutes, then uncovered 20–30 min. Check from 15 minutes uncovered.

    Ready when: Crust at least medium-dark brown all around.

    A baker lifts a hot pot lid with an oven mitt, revealing a white loaf with a naturally opened top.
    07 Load and bakeThe plain round shown uses the natural seam opening; the central pressed band is optional. Uncover with mitts and finish browning.
  8. 08 · Cool

    At least 20 min

    Use: Baked loaves

    Turn the bread out and cool on a rack with air beneath it. Wait at least 20 minutes before slicing; allow longer if the center is still very hot.

    Ready when: Crumb begins to set; crust stays aired on the rack.

    A baker arranges a wire rack holding two intact golden-brown round loaves with naturally burst tops.
    08 CoolLet air circulate underneath both loaves and give the crumb time to set before slicing.

What to look for

StageLook and feelNeeds attention
Mature poolishBubbly and roughly tripled; bubbles break at the surface every few seconds.Using a quiet, underdeveloped build or waiting until it has collapsed well past peak.
Bulk doughAbout 2½ times its initial volume. Folds should give increasing support.Tearing the dough during folds or judging only by time.
ProofA gentle finger dent returns slowly and incompletely.Waiting until the whole loaf is fragile or collapses at a touch.

Troubleshooting

If you seeLikely causeWhat to do nowNext time
Poolish is ready too earlyThe room was warmer than the reference recipe’s overnight reference temperature.Use the build at its mature stage if possible; do not deliberately leave it collapsing for hours.Use a cooler location or adjust the next build’s water temperature and timing.
Little rise by the stated timeCooler dough or room; weak or inaccurate yeast dose.Check dough temperature and expansion. Allow more time in a gently warm place; continue only when the recipe’s volume cue is reached.Weigh yeast carefully and record final dough temperature; adjust the next batch’s water temperature.
Loaf spreads or collapses at loadingFinal proof went too far or shaping left insufficient tension.Load gently and bake promptly; expect reduced height.Begin checking early, particularly in warmth. Shape with moderate tension and refrigerate a second loaf while the first bakes.
Dark bottom but pale upper crustUneven oven heat or a rack too close to the bottom element.Check oven temperature and finish by crust color while monitoring the base.Use the middle rack and a fully heated pot; verify actual oven temperature.

Recipe notes

  • The P ingredients are part of the total formula. The D row saying “all of P” is a transfer, not another portion of flour, water or yeast.
  • Plan the overnight rise for 18–21°C; warmer rooms shorten preferment maturity and dough rise.
  • The poolish’s useful peak lasts about 2 hours in a cool room, nearer 1 hour above 24°C.
  • Use the entire poolish build, including its small yeast dose; its mass is about 1,000 g.
Show ingredient flow

Recipe

White Bread with Poolish

White bread with half its flour fermented in a 100% hydration poolish; suitable for pizza and focaccia.

How do I make it?

  1. Make the overnight mixture

    12–14 h at 18–21°C

    Make the poolish, a flour-and-water mixture that rises before the main dough: mix the flour and yeast listed in group P, then stir in all the group P water. Cover and leave at 18–21°C.

    A baker lifts the lid from a round clear bowl of bubbly, batter-like mature poolish.
    Use the poolish when it is well expanded and covered in lively bubbles.

    Ready when: Bubbly and roughly three times bigger, with bubbles popping at the surface every few seconds.

  2. Mix the main dough

    A few minutes

    Mix the flour, salt and yeast listed in group D. Pour the group D water around the prepared poolish to loosen it, then add all this mixture to the group D dry ingredients. With a wet hand, alternate 5–6 pinches through the dough using your thumb and forefinger with folds until evenly mixed; there is no separate flour-and-water rest.

    Viewed from above, a baker pinches through ivory dough in a clear tub while steadying its rim.
    Use all the ripe poolish and final-dough ingredients. Pinch and fold until no unmixed preferment remains.

    Ready when: Evenly mixed dough with no lumps of the prepared overnight mixture.

  3. Fold and let rise

    2–3 h from end of final mix

    Fold the dough 2–3 times during the first hour of its first rise. Each time, wet your hand, lift one edge just until it resists and fold it across; repeat around 4–5 edges until the dough firms, then turn it folded-side down. Let it relax between folding rounds, and keep it covered between rounds and for the rest of the rise.

    A baker standing side-on lifts a connected edge of ivory dough inside a clear tub.
    Lift one edge only until it resists, fold it across, then cover between sets.

    Ready when: About 2½ times its starting size.

  4. Shape the loaves

    A few minutes

    Gently tip the dough onto a lightly floured counter without tearing it and cut it into two equal pieces. Fold each piece’s edges into the middle, turn the folded side down onto a clean patch without flour, then cup and gently pull it toward you while turning to form a smooth, moderately firm ball. Place each ball folded-side DOWN in a well-floured rising basket, flour the top and cover.

    A baker cups one smooth white dough round on the bench, with a second round beside an empty basket.
    Divide evenly and cup each piece into a round without tearing its surface.

    Ready when: Two moderately firm rounds with no tears on the surface.

  5. Let the loaves rise

    About 1 h; preheat promptly

    Keep the shaped loaves covered as they rise. Gently press a loaf with a floured fingertip to make a small dent: it is ready when the dent slowly rises partway back. If it springs straight back, wait longer; if the dent stays and the loaf feels loose and weak, it may have risen too far.

    A baker gently presses a floured fingertip into one of two expanded white dough rounds in baskets.
    Let the rounds become puffy; a small fingertip dent should return slowly and only partway.

    Ready when: The loaf has grown and feels airy; a finger dent slowly rises partway back.

  6. Heat the oven and pots

    At least 45 min at 245°C

    Heat the heavy lidded pots on the oven’s middle rack until fully hot. If you have only one pot, put the second loaf in the fridge about 20 minutes before baking the first. Reheat the empty pot for 5 minutes before baking the second loaf.

    A baker wearing oven mitts positions two lidded black Dutch ovens on an oven rack.
    Heat the covered pots thoroughly while the loaves finish proofing.

    Ready when: The pots and oven are fully hot.

  7. Bake the bread

    245°C throughout

    Turn the loaf out onto a floured counter folded-side up; for the optional grooved top, flour a stripe across the middle, press a 2.5 cm dowel down to the counter and roll it slightly to make a flat band about 2.5 cm wide. Use oven mitts to lower the loaf folded-side UP into the hot pot without touching the sides; the top needs no cuts. Bake covered for 30 minutes, then uncovered for 20–30 minutes, checking from 15 minutes after removing the lid.

    A baker lifts a hot pot lid with an oven mitt, revealing a white loaf with a naturally opened top.
    The plain round shown uses the natural seam opening; the central pressed band is optional. Uncover with mitts and finish browning.

    Ready when: The crust is medium-dark brown or darker all around.

  8. Let it cool

    At least 20 min

    Take the bread out of the pot and set it on a rack so air can pass underneath. Wait at least 20 minutes before slicing, and longer if the middle is still very hot.

    A baker arranges a wire rack holding two intact golden-brown round loaves with naturally burst tops.
    Let air circulate underneath both loaves and give the crumb time to set before slicing.

    Ready when: The inside is beginning to firm up while air can reach the crust.

What can go wrong, and how can I fix it?

What you noticeLikely causeWhat to do
Poolish is ready too earlyThe room was warmer than the reference recipe’s overnight reference temperature.Use the build at its mature stage if possible; do not deliberately leave it collapsing for hours. Use a cooler location or adjust the next build’s water temperature and timing.
Little rise by the stated timeCooler dough or room; weak or inaccurate yeast dose.Check dough temperature and expansion. Allow more time in a gently warm place; continue only when the recipe’s volume cue is reached. Weigh yeast carefully and record final dough temperature; adjust the next batch’s water temperature.
Loaf spreads or collapses at loadingFinal proof went too far or shaping left insufficient tension.Load gently and bake promptly; expect reduced height. Begin checking early, particularly in warmth. Shape with moderate tension and refrigerate a second loaf while the first bakes.
Dark bottom but pale upper crustUneven oven heat or a rack too close to the bottom element.Check oven temperature and finish by crust color while monitoring the base. Use the middle rack and a fully heated pot; verify actual oven temperature.
Useful recipe notes

The P ingredients are part of the total formula. The D row saying “all of P” is a transfer, not another portion of flour, water or yeast.

Plan the overnight rise for 18–21°C; warmer rooms shorten preferment maturity and dough rise.

The poolish’s useful peak lasts about 2 hours in a cool room, nearer 1 hour above 24°C.

Use the entire poolish build, including its small yeast dose; its mass is about 1,000 g.

See the detailed method and ratios in , or follow ingredients through the .

Ingredient proportions & recipe details

White Bread with Poolish at a glance

Makes
2 loaves, each about 680 g after baking
Heat
245°C conventional
Baking time
30 min covered + 20–30 min uncovered
Dough hydration
75%
Prefermented flour
50% of total flour
Leavening
Yeast
Bulk fermentation
2–3 h from end of final mix · About 2½ times its initial volume.
How do the ingredient proportions compare?

Core dough totals include the flour and water in the portion of starter or preferment used. Do not add them again. Toppings, fillings and dusting flour are separate.

Formula componentGramsFlour = 100%
Total flour1000 g100%
Total water750 g75%
Salt21 g2.1%
Instant yeast3.4 g0.3%

White bread with biga

Makes
2 loaves, each about 680 g after baking
Heat
245°C conventional
Baking time
30 min covered + 20–30 min uncovered

Preheat covered pots for at least 45 min. Check the crust after 15 min uncovered.

Breads with preferments

White bread with biga

A white loaf with 80% of its flour in a stiff overnight biga; suitable for pizza and focaccia.

Method

  1. 01 · Build biga

    12–14 h at 18–21°C

    Use: P

    Take about 44.4 mL from the measured P water to wet the P yeast in a small cup; wait a few minutes and stir. Add to P flour, rinse the cup with another little portion of measured P water, then add all remaining P water. Pinch through with thumb and forefinger, alternating with folds until incorporated. Cover at 18–21°C.

    Ready when: About tripled, slightly domed and dotted with gas bubbles, with a ripe fermented aroma.

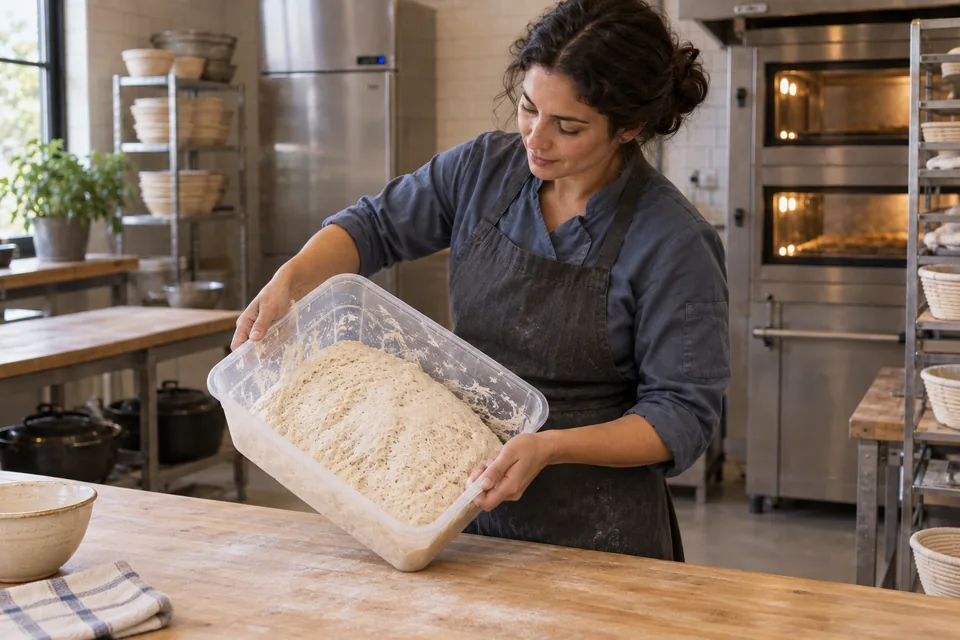
    A baker tilts a clear tub containing a cohesive, aerated ivory biga with a domed porous surface.
    01 Build bigaThe ripe biga should hold a soft dome and show gas bubbles while remaining a cohesive dough.
  2. 02 · Mix final dough

    A few minutes

    Use: D + all mature P

    Mix D flour, salt and yeast; add D water and combine briefly. Add all the mature biga. Wet your hand and alternate 5–6 thumb-and-forefinger pinch cuts with folds until the stiff biga and fresh dough are evenly blended.

    Ready when: Uniform dough with no unmixed lumps of preferment.

    Viewed from above, a baker pinches through ivory dough in a clear tub while steadying its rim.
    02 Mix final doughBlend all the mature biga with the fresh dough using pinch cuts and folds until the mixture is uniform.
  3. 03 · Fold and bulk

    2½–3½ h from end of final mix

    Use: Mixed dough

    Apply 2–3 sets during the first 1½ hours. For each set, wet your hand; stretch one edge upward only to resistance and fold across. Repeat around 4–5 edges until the dough firms, then turn the whole mass seam down. Let it relax before the next set. Cover between folds and during the remaining rise.

    Ready when: About 3 times its initial volume.

    A baker standing side-on lifts a connected edge of ivory dough inside a clear tub.
    03 Fold and bulkLift one edge only until it resists, fold it across, then cover between sets.
  4. 04 · Divide and shape

    A few minutes

    Use: Risen dough; dusting flour

    Ease dough onto a lightly floured counter without tearing. Divide equally. Fold each piece’s edges inward to enclose it, turn seam down onto a clean unfloured patch, and cup and drag toward you while turning to make a medium-tight ball. Set seam DOWN in a well-floured basket; flour the top and cover.

    Ready when: Two rounds with moderate tension and intact surfaces.

    A baker cups one smooth white dough round on the bench, with a second round beside an empty basket.
    04 Divide and shapeDivide evenly and cup each piece into a round without tearing its surface.
  5. 05 · Proof

    About 1 h; preheat promptly

    Use: Shaped loaves

    Proof covered. Gently press the loaf with a floured fingertip to make a small dent: a slow, incomplete return indicates readiness; immediate spring-back means wait; no return with a slack loaf suggests overproofing.

    Ready when: Loaf aerated and expanded; indentation recovers slowly and incompletely.

    A baker gently presses a floured fingertip into one of two expanded white dough rounds in baskets.
    05 ProofLet the rounds become puffy; a small fingertip dent should return slowly and only partway.
  6. 06 · Preheat during proof

    At least 45 min at 245°C

    Use: Oven and lidded pots

    Put lidded Dutch ovens on the middle rack and heat fully. If using one pot, refrigerate the second room-proofing loaf about 20 minutes before baking the first; reheat the empty pot 5 minutes between loaves.

    Ready when: Pots and oven fully heat-soaked.

    A baker wearing oven mitts positions two lidded black Dutch ovens on an oven rack.
    06 Preheat during proofHeat the covered pots thoroughly while the loaves finish proofing.
  7. 07 · Load and bake

    245°C throughout

    Use: Proofed loaf

    Invert the loaf onto a lightly floured counter, then carefully lower it seam UP into the hot pot, avoiding the hot sides. No scoring is needed: the seam opens naturally. Use mitts for the pot and lid. Bake covered 30 minutes, then uncovered 20–30 min. Check from 15 minutes uncovered.

    Ready when: Crust at least medium-dark brown all around.

    A baker lifts a hot pot lid with an oven mitt, revealing a white loaf with a naturally opened top.
    07 Load and bakeThe seam opens by itself. After the covered bake, remove the lid with mitts and finish browning uncovered.
  8. 08 · Cool

    At least 20 min

    Use: Baked loaves

    Turn the bread out and cool on a rack with air beneath it. Wait at least 20 minutes before slicing; allow longer if the center is still very hot.

    Ready when: Crumb begins to set; crust stays aired on the rack.

    A baker arranges a wire rack holding two intact golden-brown round loaves with naturally burst tops.
    08 CoolLet air circulate underneath both loaves and give the crumb time to set before slicing.

What to look for

StageLook and feelNeeds attention
Mature bigaAbout tripled, slightly domed and dotted with gas bubbles, with a ripe fermented aroma.Using a quiet, underdeveloped build or waiting until it has collapsed well past peak.
Bulk doughAbout 3 times its initial volume. Folds should give increasing support.Tearing the dough during folds or judging only by time.
ProofA gentle finger dent returns slowly and incompletely.Waiting until the whole loaf is fragile or collapses at a touch.

Troubleshooting

If you seeLikely causeWhat to do nowNext time
Biga is ready too earlyThe room was warmer than the reference recipe’s overnight reference temperature.Use the build at its mature stage if possible; do not deliberately leave it collapsing for hours.Use a cooler location or adjust the next build’s water temperature and timing.
Little rise by the stated timeCooler dough or room; weak or inaccurate yeast dose.Check dough temperature and expansion. Allow more time in a gently warm place; continue only when the recipe’s volume cue is reached.Weigh yeast carefully and record final dough temperature; adjust the next batch’s water temperature.
Loaf spreads or collapses at loadingFinal proof went too far or shaping left insufficient tension.Load gently and bake promptly; expect reduced height.Begin checking early, particularly in warmth. Shape with moderate tension and refrigerate a second loaf while the first bakes.
Dark bottom but pale upper crustUneven oven heat or a rack too close to the bottom element.Check oven temperature and finish by crust color while monitoring the base.Use the middle rack and a fully heated pot; verify actual oven temperature.

Recipe notes

  • The P ingredients are part of the total formula. The D row saying “all of P” is a transfer, not another portion of flour, water or yeast.
  • Plan the overnight rise for 18–21°C; warmer rooms shorten preferment maturity and dough rise.
  • The biga is 68% hydration. Use the entire prepared build; its listed transfer weight is rounded.
  • At 23°C final dough, allow about 3½ hours of bulk rise; at 26–27°C, about 2½–3 hours. Wait for the dough to triple.
  • The biga weighs about 1,345 g. Total yeast in the final dough is about 2.6 g.
Show ingredient flow

Recipe

White bread with biga

A white loaf with 80% of its flour in a stiff overnight biga; suitable for pizza and focaccia.

How do I make it?

  1. Make the firm overnight dough

    12–14 h at 18–21°C

    Make the biga, a firm dough that rises before the main mix: take about 44.4 mL from the measured group P water to wet the group P yeast in a cup, wait a few minutes and stir. Add this to the group P flour, rinse the cup with a little more of the measured group P water, then add all the remaining group P water. Pinch through the dough with your thumb and forefinger and alternate with folds until mixed, then cover at 18–21°C.

    A baker tilts a clear tub containing a cohesive, aerated ivory biga with a domed porous surface.
    The ripe biga should hold a soft dome and show gas bubbles while remaining a cohesive dough.

    Ready when: About three times bigger, slightly rounded on top and dotted with bubbles, with a fermented smell.

  2. Mix the main dough

    A few minutes

    Mix the group D flour, salt and yeast, add the group D water and mix briefly. Add all the prepared biga, the firm dough made in the first step. With a wet hand, alternate 5–6 pinches through the dough using your thumb and forefinger with folds until the old and new dough are evenly combined.

    Viewed from above, a baker pinches through ivory dough in a clear tub while steadying its rim.
    Blend all the mature biga with the fresh dough using pinch cuts and folds until the mixture is uniform.

    Ready when: Evenly mixed dough with no lumps of the prepared overnight mixture.

  3. Fold and let rise

    2½–3½ h from end of final mix

    Fold the dough 2–3 times during the first 1½ hours of its first rise. Each time, wet your hand, lift one edge just until it resists and fold it across; repeat around 4–5 edges until the dough firms, then turn it folded-side down. Let it relax between folding rounds, and keep it covered between rounds and for the rest of the rise.

    A baker standing side-on lifts a connected edge of ivory dough inside a clear tub.
    Lift one edge only until it resists, fold it across, then cover between sets.

    Ready when: About 3 times its starting size.

  4. Shape the loaves

    A few minutes

    Gently tip the dough onto a lightly floured counter without tearing it and cut it into two equal pieces. Fold each piece’s edges into the middle, turn the folded side down onto a clean patch without flour, then cup and gently pull it toward you while turning to form a smooth, moderately firm ball. Place each ball folded-side DOWN in a well-floured rising basket, flour the top and cover.

    A baker cups one smooth white dough round on the bench, with a second round beside an empty basket.
    Divide evenly and cup each piece into a round without tearing its surface.

    Ready when: Two moderately firm rounds with no tears on the surface.

  5. Let the loaves rise

    About 1 h; preheat promptly

    Keep the shaped loaves covered as they rise. Gently press a loaf with a floured fingertip to make a small dent: it is ready when the dent slowly rises partway back. If it springs straight back, wait longer; if the dent stays and the loaf feels loose and weak, it may have risen too far.

    A baker gently presses a floured fingertip into one of two expanded white dough rounds in baskets.
    Let the rounds become puffy; a small fingertip dent should return slowly and only partway.

    Ready when: The loaf has grown and feels airy; a finger dent slowly rises partway back.

  6. Heat the oven and pots

    At least 45 min at 245°C

    Heat the heavy lidded pots on the oven’s middle rack until fully hot. If you have only one pot, put the second loaf in the fridge about 20 minutes before baking the first. Reheat the empty pot for 5 minutes before baking the second loaf.

    A baker wearing oven mitts positions two lidded black Dutch ovens on an oven rack.
    Heat the covered pots thoroughly while the loaves finish proofing.

    Ready when: The pots and oven are fully hot.

  7. Bake the bread

    245°C throughout

    Turn the loaf out onto a lightly floured counter, then use oven mitts to lower it folded-side UP into the hot pot without touching the sides. Leave the top uncut—the fold will open as it bakes—and bake with the lid on for 30 minutes. Remove the lid and bake 20–30 minutes more, checking from 15 minutes after removing it.

    A baker lifts a hot pot lid with an oven mitt, revealing a white loaf with a naturally opened top.
    The seam opens by itself. After the covered bake, remove the lid with mitts and finish browning uncovered.

    Ready when: The crust is medium-dark brown or darker all around.

  8. Let it cool

    At least 20 min

    Take the bread out of the pot and set it on a rack so air can pass underneath. Wait at least 20 minutes before slicing, and longer if the middle is still very hot.

    A baker arranges a wire rack holding two intact golden-brown round loaves with naturally burst tops.
    Let air circulate underneath both loaves and give the crumb time to set before slicing.

    Ready when: The inside is beginning to firm up while air can reach the crust.

What can go wrong, and how can I fix it?

What you noticeLikely causeWhat to do
Biga is ready too earlyThe room was warmer than the reference recipe’s overnight reference temperature.Use the build at its mature stage if possible; do not deliberately leave it collapsing for hours. Use a cooler location or adjust the next build’s water temperature and timing.
Little rise by the stated timeCooler dough or room; weak or inaccurate yeast dose.Check dough temperature and expansion. Allow more time in a gently warm place; continue only when the recipe’s volume cue is reached. Weigh yeast carefully and record final dough temperature; adjust the next batch’s water temperature.
Loaf spreads or collapses at loadingFinal proof went too far or shaping left insufficient tension.Load gently and bake promptly; expect reduced height. Begin checking early, particularly in warmth. Shape with moderate tension and refrigerate a second loaf while the first bakes.
Dark bottom but pale upper crustUneven oven heat or a rack too close to the bottom element.Check oven temperature and finish by crust color while monitoring the base. Use the middle rack and a fully heated pot; verify actual oven temperature.
Useful recipe notes

The P ingredients are part of the total formula. The D row saying “all of P” is a transfer, not another portion of flour, water or yeast.

Plan the overnight rise for 18–21°C; warmer rooms shorten preferment maturity and dough rise.

The biga is 68% hydration. Use the entire prepared build; its listed transfer weight is rounded.

At 23°C final dough, allow about 3½ hours of bulk rise; at 26–27°C, about 2½–3 hours. Wait for the dough to triple.

The biga weighs about 1,345 g. Total yeast in the final dough is about 2.6 g.

See the detailed method and ratios in , or follow ingredients through the .

Ingredient proportions & recipe details

White bread with biga at a glance

Makes
2 loaves, each about 680 g after baking
Heat
245°C conventional
Baking time
30 min covered + 20–30 min uncovered
Dough hydration
75%
Prefermented flour
80% of total flour
Leavening
Yeast
Bulk fermentation
2½–3½ h from end of final mix · About 3 times its initial volume.
How do the ingredient proportions compare?

Core dough totals include the flour and water in the portion of starter or preferment used. Do not add them again. Toppings, fillings and dusting flour are separate.

Formula componentGramsFlour = 100%
Total flour1000 g100%
Total water750 g75%
Salt22 g2.2%
Instant yeast2.6 g0.3%

No-knead white bread

Makes
Three or four small loaves
Heat
230°C
Baking time
25–35 min
King Arthur Baking · reference variation

No-knead white bread

Method

  1. 01 · Mix

    1 min

    Use: Dough

    Stir in a covered 5.7 L container.

    Ready when: Rough, sticky

    A baker stirs sticky ivory dough in a clear tub with a wooden spoon.
    01 MixStir until the flour is fully moistened; the dough should remain rough and sticky.
  2. 02 · Rise

    2 h + at least 2 h chilled

    Use: Dough

    Keep at room temperature, then refrigerate.

    Ready when: Rises then settles

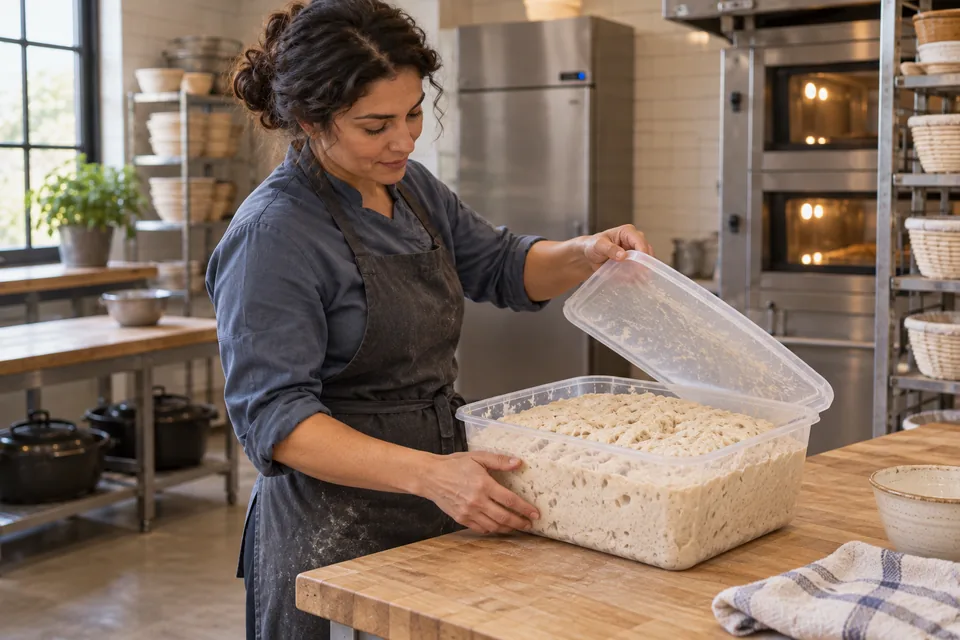
    A baker lifts a lid to inspect a tub of expanded ivory dough dotted with bubbles.
    02 RiseLet the covered batch rise at room temperature, then refrigerate before taking out a portion to shape.
  3. 03 · Shape

    —

    Use: Dough

    Remove 400–540 g; round on floured surface using oiled hands. Cover on tray.

    Ready when: Loose ball

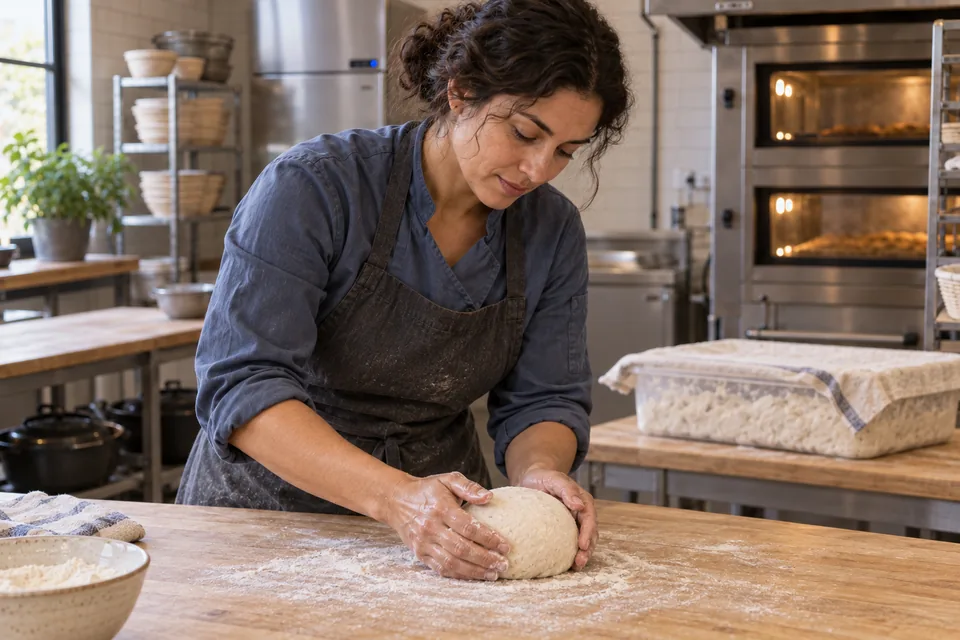
    A baker cups one small round dough portion on a floured bench, with the covered bulk container behind.
    03 ShapeTake only one portion from the chilled batch and round it gently with oiled hands.
  4. 04 · Proof

    1–2 h

    Use: Loaf

    Dust and cover. Preheat oven/steam pan at 230°C.

    Ready when: Expanded

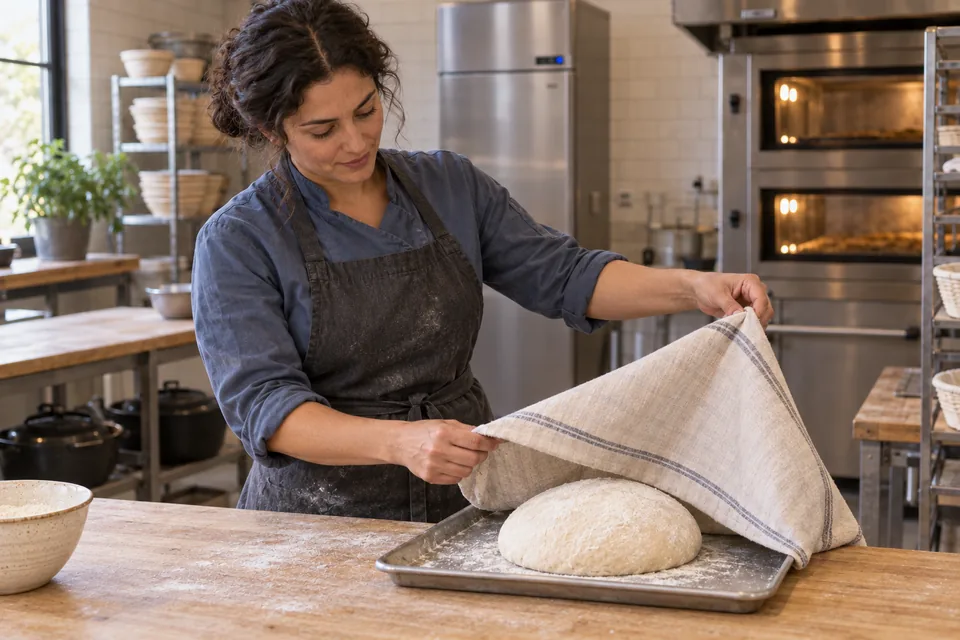
    A baker lifts a cloth from one expanded, unscored white dough round on a metal tray.
    04 ProofDust the small loaf, cover it on a tray and allow it to become puffy.
  5. 05 · Bake

    25–35 min

    Use: Loaf + steam

    Slash 13 mm deep; load loaf. Carefully pour hot water into lower metal pan.

    Ready when: Deep golden

    A baker with oven mitts checks one diagonally scored round loaf above a separate metal steam pan.
    05 BakeSlash before baking and use a separate metal pan for steam. Look for a deep golden crust.
  6. 06 · Cool

    Until cool

    Use: Bread

    Cool on rack.

    Ready when: Set crumb

    A baker leans toward one intact, diagonally scored golden round loaf on a cooling rack.
    06 CoolLeave the loaf on a rack until the crumb is cool and set.

What to look for

StageLook / feel forNeeds attention
RefrigerationRise followed by settlingTreating settling as failure

Troubleshooting

If you see thisLikely causeWhat to do nowNext time
Very slow proofCold doughAllow longerFollow expansion

Refrigerate dough up to seven days. Steam pan: metal, never glass.

Ingredient choices & substitutions
IngredientSpecified typeBrandStatus
FlourUnbleached all-purpose, 11.7% proteinKing Arthurnamed formulation; matching type is the practical alternative
YeastInstant or active dryNot specifiedspecified in recipe
IngredientAlternative / ratioAdjust handlingLikely outcome
All-purpose flourBread flour1:1 by weightWatch consistency; stronger flour absorbs more liquid.May be stronger and chewier.

Match the ingredient’s function and weight. See the flour, gluten, yeast and salt guide.

King Arthur Baking

Recipe

No-knead white bread

How do I make it?

  1. Mix a rough dough

    1 min

    Stir the dough ingredients together in a 5.7 L container until you have a rough, sticky dough, then cover it.

    A baker stirs sticky ivory dough in a clear tub with a wooden spoon.
    Stir until the flour is fully moistened; the dough should remain rough and sticky.

    Ready when: Rough, sticky

  2. Let it rise, then chill

    2 h + at least 2 h chilled

    Keep the dough covered at room temperature for 2 hours, then refrigerate it for at least 2 hours.

    A baker lifts a lid to inspect a tub of expanded ivory dough dotted with bubbles.
    Let the covered batch rise at room temperature, then refrigerate before taking out a portion to shape.

    Ready when: Rises then settles

  3. Take enough for one loaf

    —

    Take 400–540 g of dough from the container. Lightly oil your hands, shape it into a loose ball on a floured surface and put it on a tray, covered.

    A baker cups one small round dough portion on a floured bench, with the covered bulk container behind.
    Take only one portion from the chilled batch and round it gently with oiled hands.

    Ready when: Loose ball

  4. Let the loaf puff up

    1–2 h

    Dust the loaf with flour and cover it while it rises. Heat the oven and a separate metal steam pan to 230°C.

    A baker lifts a cloth from one expanded, unscored white dough round on a metal tray.
    Dust the small loaf, cover it on a tray and allow it to become puffy.

    Ready when: Expanded

  5. Cut the top and bake

    25–35 min

    Cut a 13 mm-deep slash in the loaf and put it in the oven. Carefully pour the hot water into the separate metal pan on a lower rack to make steam, then bake.

    A baker with oven mitts checks one diagonally scored round loaf above a separate metal steam pan.
    Slash before baking and use a separate metal pan for steam. Look for a deep golden crust.

    Ready when: Deep golden

  6. Cool before slicing

    Until cool

    Put the baked loaf on a rack and let it cool so the inside can set.

    A baker leans toward one intact, diagonally scored golden round loaf on a cooling rack.
    Leave the loaf on a rack until the crumb is cool and set.

    Ready when: Set crumb

What can go wrong, and how can I fix it?

What you noticeLikely causeWhat to do
Very slow proofCold doughAllow longer Follow expansion
Useful recipe notes

Refrigerate dough up to seven days. Steam pan: metal, never glass.

See the detailed method and ratios in , or follow ingredients through the .

Ingredient proportions & recipe details

No-knead white bread at a glance

Makes
Three or four small loaves
Heat
230°C
Baking time
25–35 min
Leavening
Yeast
How do the ingredient proportions compare?

Percentages compare each listed weight with the combined flour weight (100%). These are ingredient ratios, not dough hydration; milk, eggs and fillings contain other ingredients as well as water.

Formula componentGramsFlour = 100%
Unbleached all-purpose flour900 g100%
Water680 g75.6%
Table salt18 g2%
Instant yeast14 g1.6%

No-knead bread-flour loaves

Makes
2 small loaves
Heat
246°C
Baking time
20–25 min
Sally’s Baking Addiction · reference variation

No-knead bread-flour loaves

Method

  1. 01 · Mix

    Use: A

    Combine until no dry flour remains.

    Ready when: Sticky.

    A baker stirs sticky ivory dough in a clear tub with a wooden spoon.
    01 MixStir until the flour is fully moistened; the dough should remain rough and sticky.
  2. 02 · Rise

    2–3 h

    Use: Dough

    Cover at room temperature.

    Ready when: Doubled; bubbly.

    A baker lifts a lid to inspect a tub of expanded ivory dough dotted with bubbles.
    02 RiseKeep covered as the dough expands and becomes bubbly.
  3. 03 · Chill

    Optional 12–72 h

    Use:

    For better flavor, refrigerate covered.

    Ready when:

    A baker standing side-on slides a covered tub of white dough into a stainless refrigerator.
    03 ChillKeep the dough covered during its optional refrigerator rest.
  4. 04 · Shape

    45 min

    Use: B

    Divide; shape two 23 × 8 cm loaves on dusted tray, 8 cm apart. Cover.

    Ready when:

    From above, a baker finishes two spaced elongated dough loaves on a flour-dusted tray.
    04 ShapeShape two short elongated loaves, leave space between them and cover for the rest.
  5. 05 · Bake

    20–25 min

    Use:

    Preheat 246°C during rest. Cut three 1.3 cm slashes per loaf; bake.

    Ready when: Golden; centre 90°C.

    A baker with oven mitts holds a tray of two golden elongated loaves, each with three diagonal slashes.
    05 BakeMake three diagonal slashes in each loaf before baking; finish when both are golden.
  6. 06 · Cool

    ≥20 min

    Use:

    Rack before slicing.

    Ready when:

    Two intact golden elongated loaves with three slashes each rest on a wire rack in front of the baker.
    06 CoolCool both loaves on a rack before cutting.

What to look for

StageLook / feel forNeeds attention
MixWet, sticky dough.Adding flour to make it firm.

Troubleshooting

If you see thisLikely causeWhat to do nowNext time
No riseInactive yeast or insufficient timeAllow more time.Use fresh yeast.

Ingredient choices & substitutions
IngredientSpecified typeBrandStatus
YeastInstantRed Star Platinumsuggested
IngredientAlternative / ratioAdjust handlingLikely outcome
Bread flourAll-purpose1:1 by weightNo other changes.Less chewy.
Instant yeastActive drySame amountExtend rise as needed.Slower fermentation.

Match the ingredient’s function and weight. See the flour, gluten, yeast and salt guide.

Sally’s Baking Addiction

Recipe

No-knead bread-flour loaves

How do I make it?

  1. Mix the dough

    Stir the bread flour, yeast, salt and water together until all the flour is wet; the dough will be sticky.

    A baker stirs sticky ivory dough in a clear tub with a wooden spoon.
    Stir until the flour is fully moistened; the dough should remain rough and sticky.

    Ready when: Sticky.

  2. Let it rise

    2–3 h

    Cover the dough and leave at room temperature until doubled and bubbly.

    A baker lifts a lid to inspect a tub of expanded ivory dough dotted with bubbles.
    Keep covered as the dough expands and becomes bubbly.

    Ready when: Doubled; bubbly.

  3. Chill for more flavour

    Optional 12–72 h

    If you have time, refrigerate the covered dough for 12–72 hours to develop more flavour.

    A baker standing side-on slides a covered tub of white dough into a stainless refrigerator.
    Keep the dough covered during its optional refrigerator rest.
  4. Shape two loaves

    45 min

    Divide the dough in half and shape each piece into a loaf about 23 × 8 cm. Put them on a dusted tray with 8 cm between them, then cover and rest for 45 minutes.

    From above, a baker finishes two spaced elongated dough loaves on a flour-dusted tray.
    Shape two short elongated loaves, leave space between them and cover for the rest.
  5. Cut the tops and bake

    20–25 min

    Heat the oven to 246°C while the loaves rest. Make three cuts 1.3 cm deep across the top of each loaf, then bake until golden and 90°C in the centre.

    A baker with oven mitts holds a tray of two golden elongated loaves, each with three diagonal slashes.
    Make three diagonal slashes in each loaf before baking; finish when both are golden.

    Ready when: Golden; centre 90°C.

  6. Cool before slicing

    ≥20 min

    Put the loaves on a rack and wait at least 20 minutes before slicing.

    Two intact golden elongated loaves with three slashes each rest on a wire rack in front of the baker.
    Cool both loaves on a rack before cutting.

What can go wrong, and how can I fix it?

What you noticeLikely causeWhat to do
No riseInactive yeast or insufficient timeAllow more time. Use fresh yeast.

See the detailed method and ratios in , or follow ingredients through the .

Ingredient proportions & recipe details

No-knead bread-flour loaves at a glance

Makes
2 small loaves
Heat
246°C
Baking time
20–25 min
Leavening
Yeast